Important
Unless otherwise specified, parameters that represent phone numbers, e.g., Phone, CallId, are expected as a 10-digit string without spaces or dashes.
We have already introduced some very specific integration points elsewhere in this document, but there are a several other ways in which DialedIn CCaaS (formerly ChaseData) allows integration with 3rd Party or external systems, which we’ll discuss here.
HTTP is a protocol that is used to send information through webservers; POST and GET are HTTP request methods. GET is usually intended to retrieve data, while POST is intended to send data to a server to create/update a resource, and POST can carry more data.
With the GET method, the data is sent as URL parameters that are usually strings of name and value pairs separated by ampersands (&). In general, a URL with GET data will look like this:https://www.example.com/action.php?name=john&age=24
With the POST method, the data is sent to the server as a package in a separate communication with the processing script. Data sent through the POST method will not be visible in the URL.
The DialedIn CCaaS system includes messages that can be used with either GET or POST methods to facilitate a number of operations on the data stored in the database. These messages are handled through one of the following:https://api.chasedatacorp.com/HttpImport/https://portal.chasedatacorp.com/api/
Before we go through the specifics, it is important to mention that you will need an authentication token for every operation, which you will need to set up via Integration Settings (refer to Setting Up API Tokens).
The available messages and the operations they invoke are as follows.
Unless otherwise specified, parameters that represent phone numbers, e.g., Phone, CallId, are expected as a 10-digit string without spaces or dashes.
https://api.chasedatacorp.com/HttpImport/:
| Purpose |
|
|---|---|
| Minimum required identifying name‐value pairs |
|
| Optional insertion behavior name-value pairs |
|
| Optional Hot Lead insertion name-value pairs (applicable if ImportOnly = 0) |
|
| Optional Callback name-value pairs |
|
| Other optional name‐value pairs |
|
Example (shown as GET):https://api.chasedatacorp.com/HttpImport/InjectLead.php?token=ABCDEFGHIJK&accid=test&Campaign=TEST&Subcampaign=HotLeads&FirstName=John&LastName=Smith&PrimaryPhone=5553334444&adv_MobilePhone=5552226666
| Purpose |
|
|---|---|
| Minimum required identifying name‐value pairs |
|
| Optional Callback name-value pairs |
|
| Other optional name‐value pairs |
|
Example (shown as GET):https://api.chasedatacorp.com/HttpImport/UpdateLead.php?token=ABCDEFGHIJK&accid=test&SearchField=Phone&Identifier=5553334444&FirstName=John&LastName=Smith&adv_MobilePhone=5552226666
| Purpose |
|
|---|---|
| Minimum required name‐value pairs |
|
Parameters (name‐value pairs) for Action DispositionLead |
|
Parameters (name‐value pairs) for Action SearchLead |
|
Parameters (name‐value pairs) for Action InsertDnc |
|
Parameters (name‐value pairs) for Action DeleteDnc |
|
Examples (shown as GET):
https://api.chasedatacorp.com/HttpImport/LeadOperations.php?token=ABCDEFGHIJK&accid=test&Action=DispositionLead&LeadId=1234&Disposition=TestDispo
https://api.chasedatacorp.com/HttpImport/LeadOperations.php?token=ABCDEFGHIJK&accid=test&Action=SearchLead&SearchField=Phone&Identifier=5554441111&Detailed=0
https://api.chasedatacorp.com/HttpImport/LeadOperations.php?token=ABCDEFGHIJK&accid=test&Action=InsertDnc&Number=5553331111
https://api.chasedatacorp.com/HttpImport/LeadOperations.php?token=ABCDEFGHIJK&accid=test&Action=DeleteDnc&Number=5552221111
| Purpose |
|
|---|---|
| Minimum required name‐value pairs |
|
Additional parameters (name‐value pairs) for Action AddPhone |
|
Additional parameters (name‐value pairs) for Action DeletePhone |
|
Additional parameters (name‐value pairs) for Action PhoneDialed |
|
Additional parameters (name‐value pairs) for Action PhoneUnDialed |
|
Examples (shown as GET):
https://api.chasedatacorp.com/HttpImport/AgentDialList.php?token=ABCDEFGHIJK&accid=test&Action=CreateList&Agent=agent-login-name&List=new-list-name
https://api.chasedatacorp.com/HttpImport/AgentDialList.php?token=ABCDEFGHIJK&accid=test&Action=DeleteList&Agent=agent-login-name&List=new-list-name
https://api.chasedatacorp.com/HttpImport/AgentDialList.php?token=ABCDEFGHIJK&accid=test&Action=AddPhone&Agent=agent-login-name&List=new-list-name&Phone=5559998888
https://api.chasedatacorp.com/HttpImport/AgentDialList.php?token=ABCDEFGHIJK&accid=test&Action=DeletePhone&Agent=agent-login-name&List=new-list-name&Phone=5559998888
https://api.chasedatacorp.com/HttpImport/AgentDialList.php?token=ABCDEFGHIJK&accid=test&Action=PhoneDialed&Agent=agent-login-name&List=new-list-name&Phone=5559997777
https://api.chasedatacorp.com/HttpImport/AgentDialList.php?token=ABCDEFGHIJK&accid=test&Action=PhoneUnDialed&Agent=agent-login-name&List=new-list-name&Phone=5559996666
| Purpose |
|
|---|---|
| Minimum required name‐value pairs |
|
Parameters (name‐value pairs) for Action SendSms |
|
Optional Parameters (name‐value pairs) for Action SendSms |
|
Example (shown as GET):
https://api.chasedatacorp.com/HttpImport/TextOperations.php?token=ABCDEFGHIJK&accid=test&Action=SendSms&From=5553331111&To=5552226666&Message=Hello
| Purpose |
|
|---|---|
| Minimum required name‐value pairs |
|
Parameters (name‐value pairs) for Action ConferenceCall |
|
Parameters (name‐value pairs) for Action TransferCall |
|
Parameters (name‐value pairs) for Action TerminateCall |
|
Parameters (name‐value pairs) for Action AvailableInboundAgents |
|
Examples (shown as GET):
https://api.chasedatacorp.com/HttpImport/CallOperations.php?token=ABCDEFGHIJK&accid=test&Action=ConferenceCall&Agent=agent-login-name&Phone=5553331111&PrivateConference=0
https://api.chasedatacorp.com/HttpImport/CallOperations.php?token=ABCDEFGHIJK&accid=test&Action=TransferCall&Phone=5553331111&CallId=5556661111
https://api.chasedatacorp.com/HttpImport/CallOperations.php?token=ABCDEFGHIJK&accid=test&Action=TerminateCall&CallId=5556662222
https://api.chasedatacorp.com/HttpImport/CallOperations.php?token=ABCDEFGHIJK&accid=test&Action=AvailableInboundAgents&DID=5553337777&CallId=5556663333
| Purpose |
|
|---|---|
| Minimum required name‐value pairs |
|
Parameters (name‐value pairs) for Action UpdatePriority |
|
Parameters (name‐value pairs) for Action Reload |
|
Examples (shown as GET):
https://api.chasedatacorp.com/HttpImport/SkillListOperations.php?token=ABCDEFGHIJK&accid=test&Action=UpdatePriority&Skill=skill-1&Source=5552226666&Priority=10&Delay=30&Active=1
https://api.chasedatacorp.com/HttpImport/SkillListOperations.php?token=ABCDEFGHIJK&accid=test&Action=Reload
| Purpose |
|
|---|---|
| Minimum required name‐value pairs |
|
Additional parameters (name‐value pairs) for Action EnableFilter |
|
Additional parameters (name‐value pairs) for Action DisableFilter |
|
Additional parameters (name‐value pairs) for Action Reload |
|
Additional parameters (name‐value pairs) for Action AssignFilter |
|
Additional parameters (name‐value pairs) for Action RemoveFilter |
|
Examples (shown as GET):
https://api.chasedatacorp.com/HttpImport/PlaylistOperations.php?token=ABCDEFGHIJK&accid=test&Action=EnableFilter&Playlist=MyList&Filter=Filter1
https://api.chasedatacorp.com/HttpImport/PlaylistOperations.php?token=ABCDEFGHIJK&accid=test&Action=DisableFilter&Playlist=MyList&Filter=Filter1
https://api.chasedatacorp.com/HttpImport/PlaylistOperations.php?token=ABCDEFGHIJK&accid=test&Action=Reload&Playlist=MyList
https://api.chasedatacorp.com/HttpImport/PlaylistOperations.php?token=ABCDEFGHIJK&accid=test&Action=AssignFilter&Playlist=MyList&Filter=Filter1
https://api.chasedatacorp.com/HttpImport/PlaylistOperations.php?token=ABCDEFGHIJK&accid=test&Action=RemoveFilter&Playlist=MyList&Filter=Filter1
https://portal.chasedatacorp.com/api/:
| Purpose |
|
|---|---|
| Minimum required name‐value pairs |
|
| Parameters (name‐value pairs) |
|
| Notes |
|
Examples:
https://portal.chasedatacorp.com/api/available_agents?token=ABCDEFGHIJK&sourceDID=5554443333&filter_fields[]=State&filter_values[]=FL
https://portal.chasedatacorp.com/api/available_agents?token=ABCDEFGHIJK&sourceDID=5554443333&filter_fields[]=Team%20State%20Location&filter_values[]=Sales%20FL%Miami
Example response:
{"available_agents": 30}
PHP is a server scripting language, where scripts are executed on the server; the result is returned to the browser as plain HTML. PHP scripts can collect form data, as well as add, delete, and modify data in the database. The default file extension for PHP files is .php.
Note that within a PHP script you could actually send HTTP requests; that's not the intention here, but rather to perform the operations on the database in a more programmatic (controlled) manner.
In order to use PHP to insert, or update Contact (lead) records in the database, a PHP script would need to be developed; in order to work, this cunstom PHP script must include the DialedIn PowerImportAPI PHP script unmodified. This PowerImportAPI.php file will be provided by DialedIn upon request.
Following are guidelines and examples on how all this works.
The first thing to do by a user script or procedure is to include the PowerImportAPI.php file and instantiate the PowerImportAPI class (defined in the file that was included). That class contains the necessary record array, public functions, and supporting variables and private functions needed to execute the desired operations (insert, update, or delete contact record).


When instantiating PowerImportAPI, the following need to be considered:
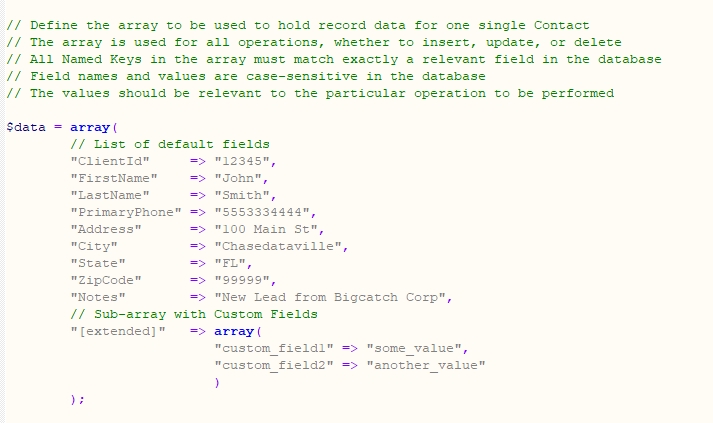
The next thing is to define the data representing the Contact record to be handled; this is an Associative Array ($data in the example that follows) containing pairs of Named Keys and Values, where each Named Key represents a Default Field as referenced in the System-Provided Contact Fields table in Custom Data, under General Tools and Data.
If Custom Fields also need to be accounted for, these fields must be defined in a sub-array with Named Key [extended], which contains a Named Key‐Value pair for each relevant Custom Field.
It's important to understand that Named Keys must match exactly a Default Field or a Custom Field, as applicable, and that both names and values are case‐sensitive in the database.
The values are set or read according to the behavior of each operation (function) performed (insert, update, or delete contact record).
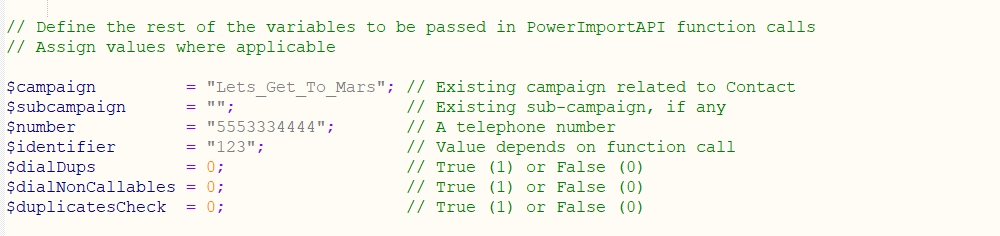
It's also important to instantiate the variables containing the relevant Campaign (existing campaign), and Sub-campaign (existing sub-campaign, if any), so they can be passed to the PowerImportAPI functions, where applicable.
Notice that these variables may represent a field in the Contact record; however, if they’re included in the $data array, as well, they may create a conflict within a particular operation, in which case it will cause the operation to fail and generate an error.
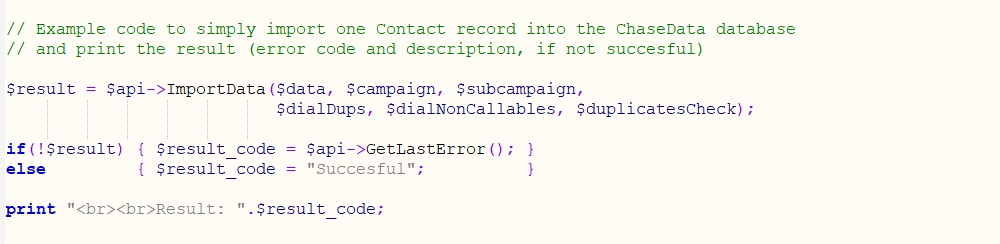
At this point, the necessary constructs have been defined and we can now proceed to call a PowerImportAPI function to execute an operation. The following example shows basic code to import one Contact record into the DialedIn CCaaS database using the ImportData function. Other PowerImportAPI functions can be used in a similar manner, according to their call signature.
It is up to the developer to determine how to loop over all Contact records that need to be processed, and populate or retrieve the values in the $data, $campaign and $subcampaign variables (as it’s applicable for each operation).
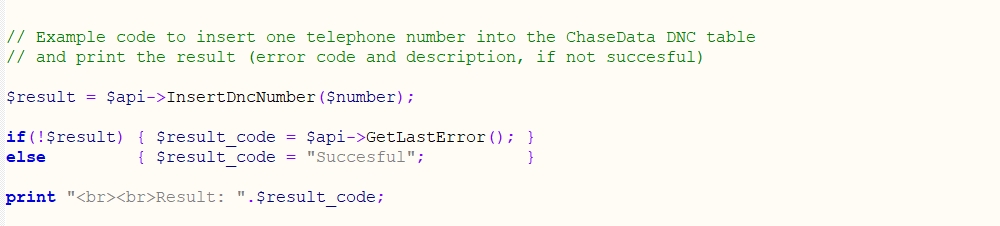
The following example shows basic code to insert one telephone number into the DialedIn CCaaS DNC table using the InsertDncNumber function.
The PowerImportAPI class makes available several functions as follows; all functions perform the corresponding operation on a single record.
ImportData (
$dataArray,
)
|
|
|---|---|
InsertHotLead (
$dataArray,
)
|
|
InsertHotLeadWithTimezoneCheck (
$dataArray,
)
|
|
UpdateDataByLeadId (
$dataArray,
)
|
|
|---|---|
UpdateDataByClientId (
$dataArray,
)
|
|
UpdateDataByPhone (
$dataArray,
)
|
|
LeadOperation (
$leadId,
)
|
|
|---|---|
AgentDialListOperation (
$action,
)
|
|
InsertDncNumber (
$number )
|
|
|---|---|
DeleteDncNumber (
$number )
|
|
| GetLastError ( ) |
|
|---|
| GetResponse ( ) |
|
|---|
API tokens are needed for authentication of HTTP GET Methods, as well as determining the corresponding subdomain.
The DialedIn solution provides the ability to import or update information using HTTP GET Methods. They can be used as wrappers for FORM actions, for example, when integration using PHP is not viable.
These methods are accessed via https://api.chasedatacorp.com/HttpImport/ and are explained under Integration.
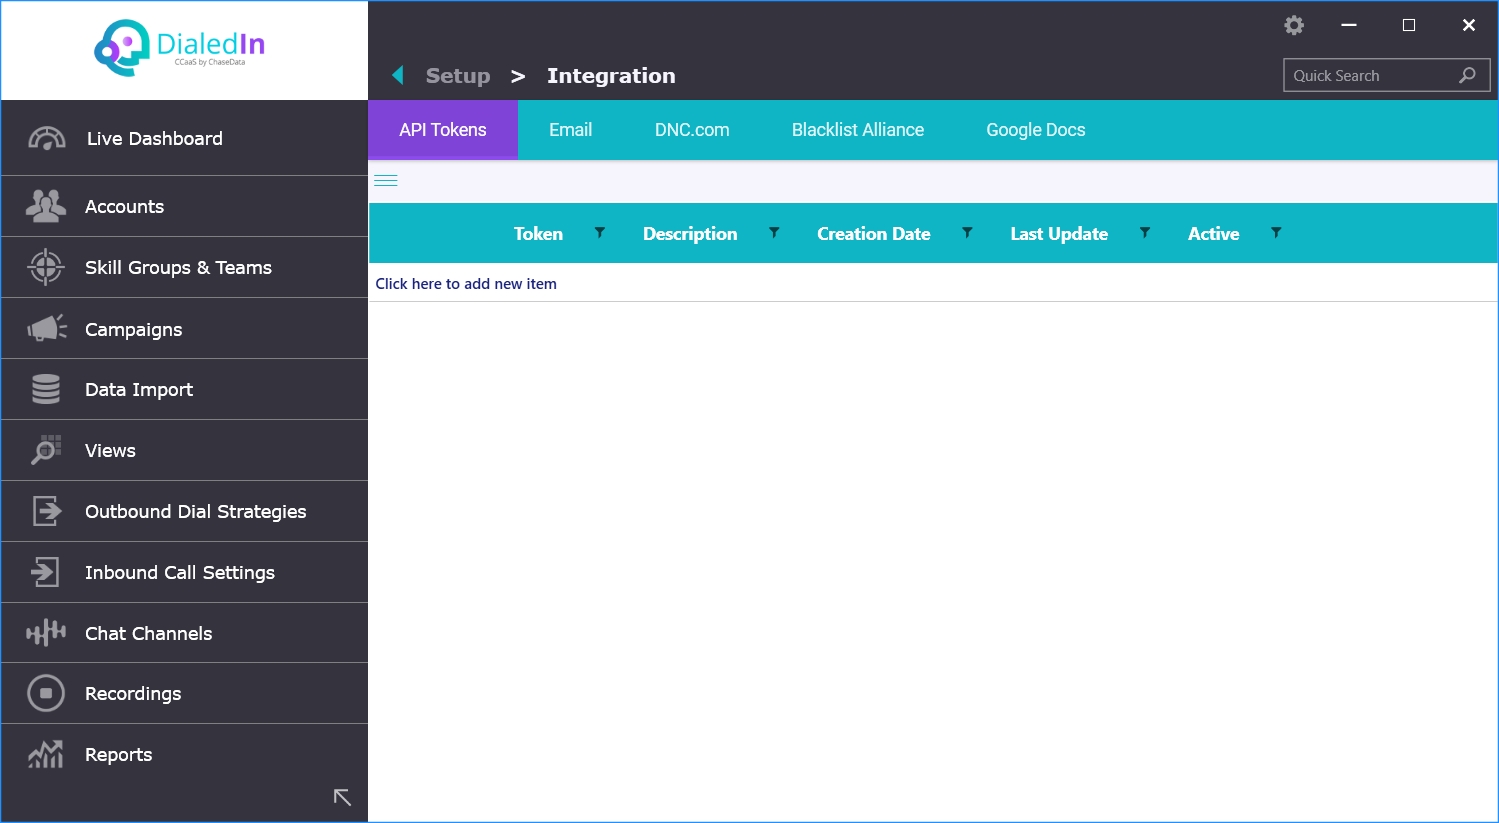
The DialedIn solution allows you to create multiple tokens for the case when you need a different one for each of your vendors, for example, when you have them injecting leads independently. To create an API Token, select the API Tokens tab.
To add a new one, click on Click here to add new item on the grey bar on top of the list, under Token. This allows you to provide a Description or label for your token. Save your change and the new Token with its Description and corresponding dates are shown. Refer to the following pictures.
Keep in mind that when using a GET method, in addition to the API Token, you are required to provide the accid, which corresponds to the FQDN prefix (e.g. if customer/vendor FQDN is test.chasedatacorp.com, accid = test); refer to the integration section.
In this section we provide an example of how an initial (onboarding) basic configuration is performed. This includes a general questionnaire, a configuration flow and planning guides.
In order to get some basic information that will aide in getting the initial DialedIn CCaaS system setup going, a questionnaire is usually provided (usually at the demo stage); for a successful setup, it is important to have a set of answers that are as detailed and accurate as possible. Following is some of the information requested.
Initial Setup Questionnaire| Date & Time | Submissions date and time |
|---|---|
| Company Name | Formal company name |
| Company Address | Street / City / State / ZIP Code / Country |
| Contact Name | Name of contact person in the company |
| Contact Email | Email of the contact person in the company |
| Contact Telephone Number | Telephone number of the contact person in the company |
| Call Center Mission | Checkboxes to indicate main types of business activities (e.g. Sales / Marketing) |
| Line of Business / Industry | Industry field in which company is involved (e.g. Insurance) |
| Business Success Measuring Factors | Checkboxes to indicate KPI and factors used to measure success of the business:
|
| Type of Contacts | Type of contacts handled by the business (e.g. Consumers) |
| Type of Calls | Type of calls handled by the business (Inbound, Outbound, Both) |
| Nationwide Calls | Indicates whether handling nationwide calls (Yes / No) |
| Most important Question That Must be Answered | The most important question that ChaseData must answer during the software demonstration |
| 2nd Most important Question That Must be Answered | The 2nd most important question that ChaseData must answer during the software demonstration |
| 3rd Most important Question That Must be Answered | The 3rd most important question that ChaseData must answer during the software demonstration |
| CRM Integration | Whether currently using CRM software that requires integration with the ChaseData CCaaS system (Yes / No) |
| Website Integration | Whether would like integration from company website or landing page in order to have the ability for inquiries to be followed up (e.g. callbacks) from the ChaseData CCaaS system (Yes / No) |
| Network Type | Type of network currently set up at the business location (e.g. Hardwired Internet) |
| Broadband Service Type | Type of broadband internet connection in use at the business location (e.g. Cable) |
| Computer Type | Type of computers in use at the business location (e.g. MS-Windows based PC) |
| Number of Agent Seats | Number of agent seats used by the business |
| Number of Agents | Total number of agents employed by the business |
| Describe Business Process | Information about the business process that will allow effective configuration and customization of the DialedIn CCaaS system |
It's important to be prepared for the specific needs of the customer that requires the Initial Configuration; that way we can focus on those configuration items that are key to get them started for their business domain and their particular needs.
The first clues come from understanding the business type; what business are they in, do they make calls, do they receive calls, how much lead/contact segmentation is typical in their business, how many agents they have, whether agents are multi-functional or specialized, etc.
With that in mind, following are a few general guidelines to consider, as follows.
Question — Are the business needs purely for Outbound calls? This would be typical for legacy telemarketers, political campaigns, and organizations that are in charge of setting appointments, to give some examples.
Answer — Start with a single Outbound Campaign; consider a couple of sub-campaigns to introduce customer to segmenting leads, then define corresponding but simple Outbound Dial Priorities; include a couple of Agents with a standard Skill.
Question — Are the business needs purely for Inbound calls? This would be typical for those who just close sales (e.g. health insurance), or a customer support organization, for example.
Answer — Start with a single Inbound Campaign; set up a basic IVR tree (Call Flow); include a couple of Agents with a standard Skill.
Question — Are the business needs for a combination of Outbound and Inbound calls? This would be typical for complex sales organizations where they have separate qualifier (front) and closer groups.
Answer — Consider whether a Blended Campaign should be used, or separate Outbound and Inbound Campaigns would be more appropriate, usually by determining if same Agent can handle both (Blended) or Agent is assigned just one or the other (separate); on Outbound, ignore sub-campaigns for now, unless it’s a specific business requirement; on Inbound, set up a basic IVR tree (Call Flow); include a couple of Agents, with either a combined Skill or two different Skills.
There are certainly many other considerations, but for an initial setup or a trial, it’s best to start a workable configuration that is as simple as possible. This will get the customer started, who after training should be able to expand the initial configuration as needed.
The following diagram depicts the initial setup flow suggested here.

There are a few things that need to be completed before a DialedIn CCaaS setup is to be performed, as follows:
Refer to Requirements to verify that the following items meet the minimum requirements in the Customer environment:
Help Customer take corrective action where needed; if not able to resolve, reschedule for when Customer is expected to have resolved the issue(s).
2 – Management Console and Agent Client InstallationRefer to Installation under Management Console and under Agent Client; follow installation instructions using the installation links provided by DialedIn.
3 – Custom FieldsPerhaps the first thing to consider is the information that the Customer needs to save and use within the ChaseData system, for each lead or contact; if a corresponding field doesn't exist already in the system by default, Custom Fields would need to be defined, and that would be assigned to the corresponding Campaign. For example, there's a system-provided PrimaryPhone field, but the Customer may also have a need for storing a secondary or mobile phone number, as well. Refer to Custom Data under General Tools and Data.
4 – CampaignFor basic Campaign there's no need for other elements to be provisioned beforehand, although we have chosen to create Custom Fields first. Other elements could be added later on, as needed, such as Custom Script Pages, Dialing Rules, Call Queues, etc.
It is important that the Campaign type is set for the right activities, Outbound, Inbound, or Blended (there are also ‘Virtual’ modes for more specialized functions). Since we decided to first create Custom Fields, also make sure to associate the corresponding Adv. Table (Custom Data) to the Campaign.
5 – Agent SkillsBefore we're ready to provision Agents, we should have at least one Skill provisioned beforehand to represent the Agent role.
Note that when a Skill is provisioned, to be of use it must be activated for one or more Campaigns, which is the key link between an Agent and a Campaign; nevertheless, this relationship can be established at any time, therefore a Skill can be provisioned before the Campaign.
Refer to Agent Skills under Accounts.
6 – AgentsJust like Campaigns, Agents are necessary for any call center activity to take place (with the exception of Virtual Campaigns); therefore, we proceed to provision a few Agents and assign them of the Skills provisioned.
Also like with Campaigns, a Skill does not have to be given to the Agent at this time, but without it the Agent will not linked to any Campaign and therefore not active for all practical purpose.
7 – Voice MessagesBoth Outbound and Inbound calls may require some custom Voice Messages; if recordings are available already for uploading, use them, otherwise for the time being could just define Voice Messages using Text-To-Speech (TTS).
Depending on the Campaign type(s) to be used, refer to Outbound Voice Prompts and/or Greetings & Announcements. If using TTS, refer to define corresponding Voice Scripts first.
8 – Lead ImportAt this point we should already have everything we need to handle calls without customized rules, except that we don’t have Leads (Contacts) to act upon. Therefore, it’s important to Import some Contacts at this time; just make sure that the column headers for the records to be imported match exactly (case-sensitive) both the Default Fields and the Custom Fields previously defined. Refer to Contacts Import and Custom Data.
9 – Outbound Sub-Campaigns and Dial PriorityWe now look into a nice-to-have setup, but also often used by typical Outbound Call Management; segmenting Contacts (Leads) into Sub-Campaigns for defining Dial Priorities.
The first step is to create Sub-Campaigns with a sub-set of the Contacts of a Campaign; refer to Sub-CampaignsCampaigns under Campaigns.
The second step is to activate and assign a priority rule to one or more of these Sub-Campaigns; refer to Dial Priority under Outbound Call Management.
This applies only if Outbound Call Management is to be performed.
10 – Inbound Call FlowThe other nice-to-have setup, in this case often used by typical Inbound Contact Centers is provisioning a Call Queue (which determines how to find an agent to take the call) and optionally defining a corresponding Call Flow (which allows for caller interactive responses). Refer to Inbound Call Queues/Ring Groups and Call FlowsInbound Call Queues/Ring Groups and Call Flows under Inbound Contact Center.
This applies only if Inbound Contact Center functions are to be performed.
11 – Wrap-Up CodesAn important part of a call center is to be able to set the disposition of calls in a manner specific to their business rules, therefore it’s highly recommended that a basic set of Wrap-up Codes is defined. Refer to Wrap-Up Codes under General Tools and Data.
We have already shown both a generic initial customer questionnaire and a basic initial setup sequence to get us started with a workable configuration. Next, we’re going to go a little further by presenting planning guides to help us start fine-tuning both Inbound and Outbound operations.
Inbound Call CenterAs we know, the purpose of the Inbound Call Center is to receive, distribute, and process incoming calls in a way that matches business needs and conditions in an optimal manner.
The key aspect, therefore, of planning for an Inbound Call Center configuration is to understand the defining components of the DialedIn CCaaS system that correspond to the business rules.
So, we need to know what types of calls we will be processing in order to map them to Agent Skills; and we need to assign these skills to Agents.
We need to know the phone number (DID) where we expect these calls to come in; if there are more than one, we need to know any relationship between them (e.g. one may present options, while another one may go straight to the final call queue). We need to know what Voice Messages to play to the caller, and under what conditions are those messages played. We need to know what to do when there are agents available, when there are agents signed-in but not available, and when there are no agents at all.
We need to know the Campaign that provides supporting information, tools and rules for the agent that answers the call; for example, a Script and/or Form to provide and gather information related to the call. We need to know what is the corresponding information that is collected and/or maintained about the Contact related to the call.
We need to know how to disposition a call, in other words, what Wrap-up Codes to be made available to the agents.
Following is a suggested planning list with example entries.
| Incoming Call Points | ||
|---|---|---|
| Label | Main-Number | Support-Direct-Number |
| Description | Main general-purpose numbers | Numbers that go straight to Support |
| Numbers (DID) | 888-555-0001 888-555-0002 |
855-555-1110 |
| Greeting Message | Main-Greeting | N/A |
| Type | IVR Tree | Direct Number |
| Decision Tree | IVR-Main | IVR-Support-Direct |
| Routing Queue | Queue-Main | Queue-Support |
| Decision Trees | ||
|---|---|---|
| Label | IVR-Main | IVR-Support-Direct |
| Description | Actions corresponding to main IVR options menu | Actions for special case responses |
| Response | 0 - "for any other requests" 1 - "for general inquiries" 2 - "to reach support" 7 - "if you want to be called back" |
7 - "no agents... if you want to be called back" |
| Action | 0 - Route to Queue 1 - Route to Queue 2 - Route to Queue 7 - Set a callback |
7 - Set a callback |
| Action Data | 0 - Queue-Main 1 - Queue-Main 2 - Queue-Support 7 - N/A |
7 - N/A |
| Voice Messages | |||
|---|---|---|---|
| Label | Description | Type | Media |
| Main-Greeting | Welcomes caller, presents all options, and requests a response | Greeting | main_greeting.mp3 |
| Support-Wait | Tells caller to wait while the system connects to next available agent | Wait | support-wait.mp3 |
| Main-Leave-Message | Requests caller to leave message after the tone | Voicemail request | main-leave-message.mp3 |
| Support-Leave-Message | Requests caller to leave message after the tone | Voicemail request | support-leave-message.mp3 |
| Call Queues | ||
|---|---|---|
| Label | Queue-Main | Queue-Support |
| Description | Agents that can take general-purpose questions | Specialized support agents |
| Agent Skill List | Skill-List-Call-Center | Skill-List-Support |
| Next Skill Timeout | 2 secs | 0 secs |
| Busy Agents Action | Wait for an agent indefinitely | Wait for an agent indefinitely |
| No Agents Action | Voicemail redirect | Voicemail redirect |
| Schedule | 24/7 | 24/7 |
| Campaign | Customer-Care-Campaign | Support-Campaign |
| Skill Lists | ||
|---|---|---|
| Label | Skill-List-Call-Center | Skill-List-Support |
| Description | List of the skills of agents that should handle general-purpose calls, in priority order | List of the skills of agents that should handle a support call, in priority order |
| Priority/Agent Skill | 1 / Call-Center-Skill 2 / T1-Support-Skill |
1 / T1-Support-Skill 2 / T2-Support-Skill 3 / Call-Center-Skill |
| Agent Skills | ||||
|---|---|---|---|---|
| Label | Description | Incoming Calls | Outgoing Calls | Manual Calls |
| Call-Center-Skill | Allowed to handle general customer care | Yes | No | No |
| T1-Support-Skill | Allowed to handle basic to medium support issues | Yes | Yes | No |
| T2-Support-Skill | Allowed to handle all types of customer care and support | Yes | Yes | Yes |
| Campaigns | |||
|---|---|---|---|
| Label | Description | Agent Script and/or Form | Contact Data |
| Customer-Care-Campaign | Provides scripts for agents handling a customer care call, identifies the information that is available for a contact, and related rules | Customer_Care_Script.docx | Customer_Fields.docx |
| Support-Campaign | Provides scripts and forms for agents handling a support call, identifies the information that for the contact, and related rules | Support_Script_and_Form.html | Customer_Fields.docx |
| Wrap-up Codes | |||
|---|---|---|---|
| Label | Description | For All Campaigns | For a Specific Campaign |
| Requested-Info | Caller has requested product information | Yes | N/A |
| Inquiry-Resolved | General inquiry was handled satisfactorily | Yes | N/A |
| Minor-Problem-Resolved | A minor reported problem was resolved | No | Support-Campaign |
| Major-Problem-Resolved | A major reported problem was resolved | No | Support-Campaign |
| General-Resolved | Non-categorized request was resolved | No | Customer-Care-Campaign |
| General-Unresolved | Non-categorized request was left unresolved | No | Customer-Care-Campaign |
As we know, the purpose of the Outbound Call Manager is to perform calls to prospective or existing customers (leads and contacts) according to business goals (e.g. marketing, sales, political campaigns, fund-raising, etc.) in a way that maximizes the use of resources (agents, lines, and time).
Planning for Outbound Call Management configurations involves many business and regulatory considerations which often influence each other. The complexity therefore requires careful analysis and a good understanding of how to map the needs and requirements to related components in the DialedIn CCaaS system.
We know that Outbound Call Management relies heavily on leads (contacts) and the rules on how, how often, and when to call them. The best way to define these rules is to group them together, which is what a Campaign is for.
The how considers things like Agent Skills, available dialing lines, dialing mode, scripts, forms; the how often considers things like dial sequence, drop rate, redialing; the when considers things like dialing hours.
Following is a suggested planning list with example entries.
| Campaigns | |||
|---|---|---|---|
| Label | New-Sales-Campaign | VIP-Campaign | Lost-Customer-Campaign |
| Description | To generate new sales from contacts that have not been previously approached | To contact key important potential customers | To try to win back previous customers |
| Caller ID | Default | 555-333-7777 | Default |
| Agent Call Script and/or Form | New_Sales_Script_and_Form.docx | VIP_Script_and_Form.html | Bring_Back_Script_and_Form.docx |
| Agent Waiting Screen | https://app.powerbi.com/view?r=abc | N/A | N/A |
| Agent Paused Screen | https://www.timeanddate.com | https://www.brainyquote.com | https://weather.com |
| Contact Data | Customer_Fields.docx | Customer_Fields.docx | Customer_Fields.docx |
| Dialing Strategy | |||
|---|---|---|---|
| Campaign | New-Sales-Campaign | VIP-Campaign | Lost-Customer-Campaign |
| Dialing Hours | 9 AM – 8 PM | 3 PM – 7 PM | 10 AM – 7 PM |
| Lines per Agent | 2 | 1 | 3 |
| Maximum Drop Rate Allowed | 0.02 | 0 | 3% - count only connected calls - include calls in last 30 days |
| Dialing Order or Priority | Dial newer leads first | Dial in the order of the contact list | No specific order, but give priority to contacts with fewer call attempts |
| Dialing Optimization (Mode) | Predictive – optimize based on number of lines, agents, drop ratio, etc. | Preview – allow agent to review contact information before dialing | Predictive |
| No Answer Actions | |||
|---|---|---|---|
| Campaign | New-Sales-Campaign | VIP-Campaign | Lost-Customer-Campaign |
| Rings to Determine No Answer | 6 | 4 | 4 |
| Wait Time Before Redial | 4 hours | N/A | Immediate |
| Redial Attempts Per Day | 2 | 1 | 1 |
| Lifetime Redial Attempts | 10 | 5 | 10 |
| Answering Machine Detection (AMD) | Yes - Accurate (accuracy more important than delay) | Yes - Optimized / Balanced | No |
| Leave Message | Yes - once per day only | Yes - once only | No |
| Wrap-up Codes | ||||||
|---|---|---|---|---|---|---|
| Label | Description | For All Campaigns | For a Specific Campaign | Can be Called Again | It's a Final State | Generate a POST action |
| Possible-Sale-Follow-Up | Somehow interested and should try again | Yes | N/A | Yes | No | sale_call_post_message.html |
| Sale-Initiated | Started transaction; need to follow up | Yes | N/A | Yes | No | sale_call_post_message.html |
| Sale-Completed | Completed transaction | Yes | N/A | Yes | No | sale_call_post_message.html |
| Call-Back | Can talk some other time | Yes | N/A | Yes | No | sale_call_post_message.html |
| Left-Message | Machine answered; left message | Yes | N/A | Yes | No | sale_call_post_message.html |
| Not-Interested-For-Now | nterested but check back in the future | Yes | N/A | Yes | No | sale_call_post_message.html |
| Not-Interested-Final | Not interested | Yes | N/A | No | Yes | sale_call_post_message.html |
Here we discuss an embedded tool provided with the DialedIn CCaaS system, which allows to create and maintain what in the system is known as custom Scripts, or HTML pages with optional embedded scripting (e.g. JavaScript) for presenting to the agent when handling calls.
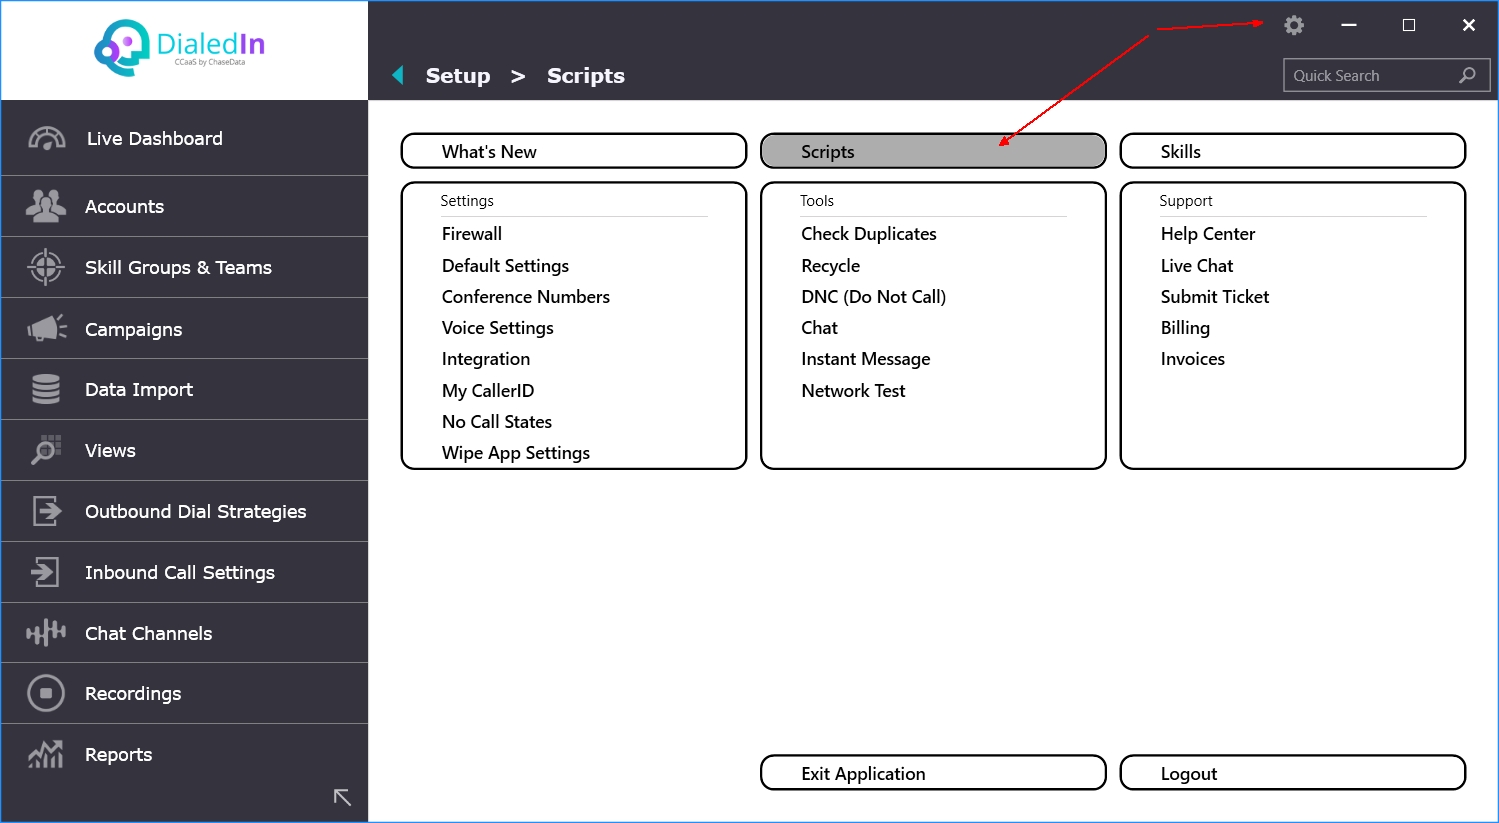
In the Scripts section under General Tools and Data, when configuring a Script page, we were presented with a Script Content checkbox for the case of Dynamic Scripts, and we indicated that by clicking on it would start the Scripting Tool, or Script Editor. Refer to the following picture.


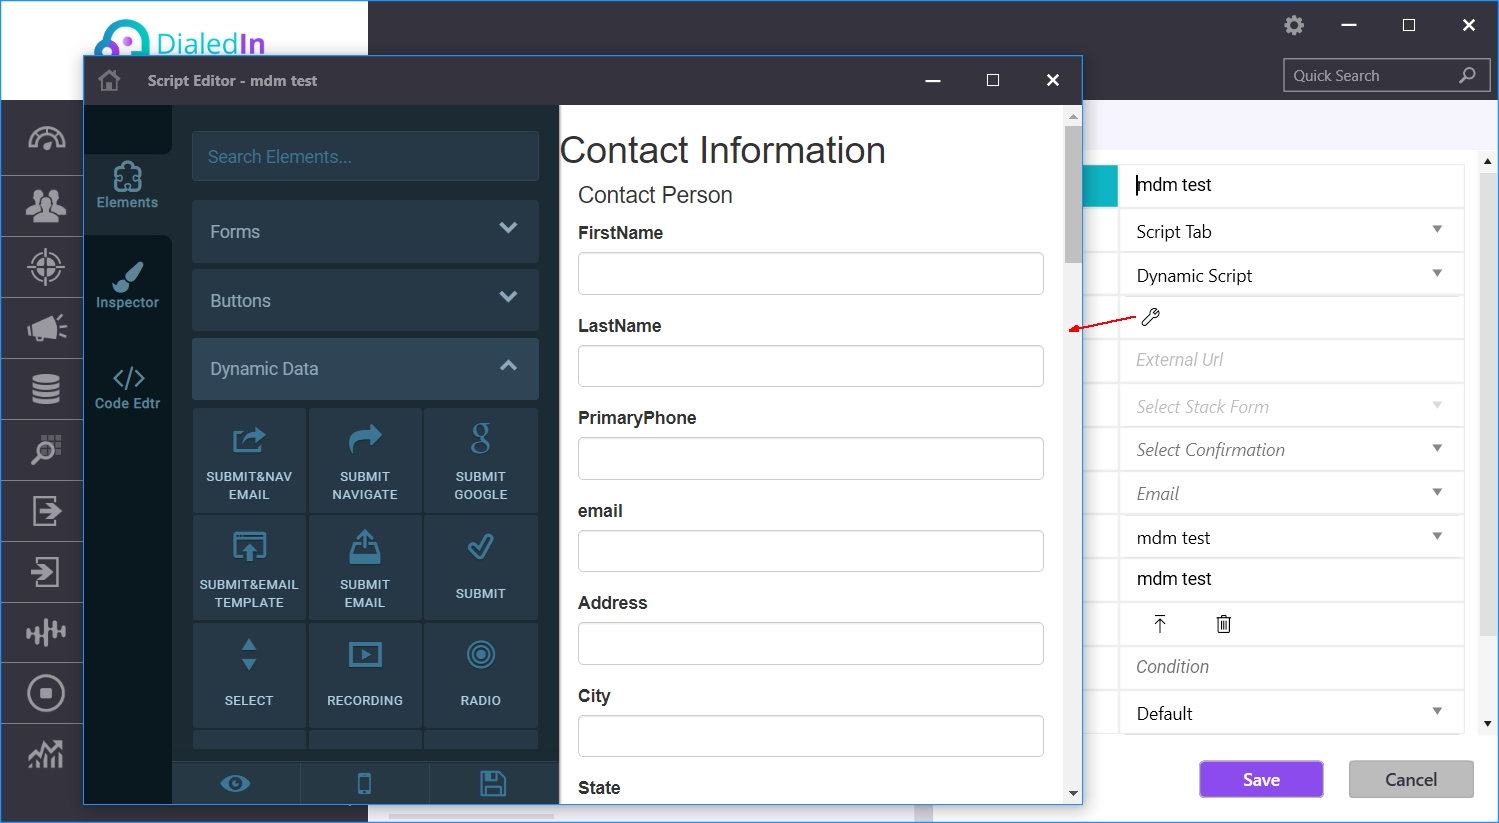
The following picture provides an example of a typical script page, already put together, opened in the Script Editor when we click on that icon.
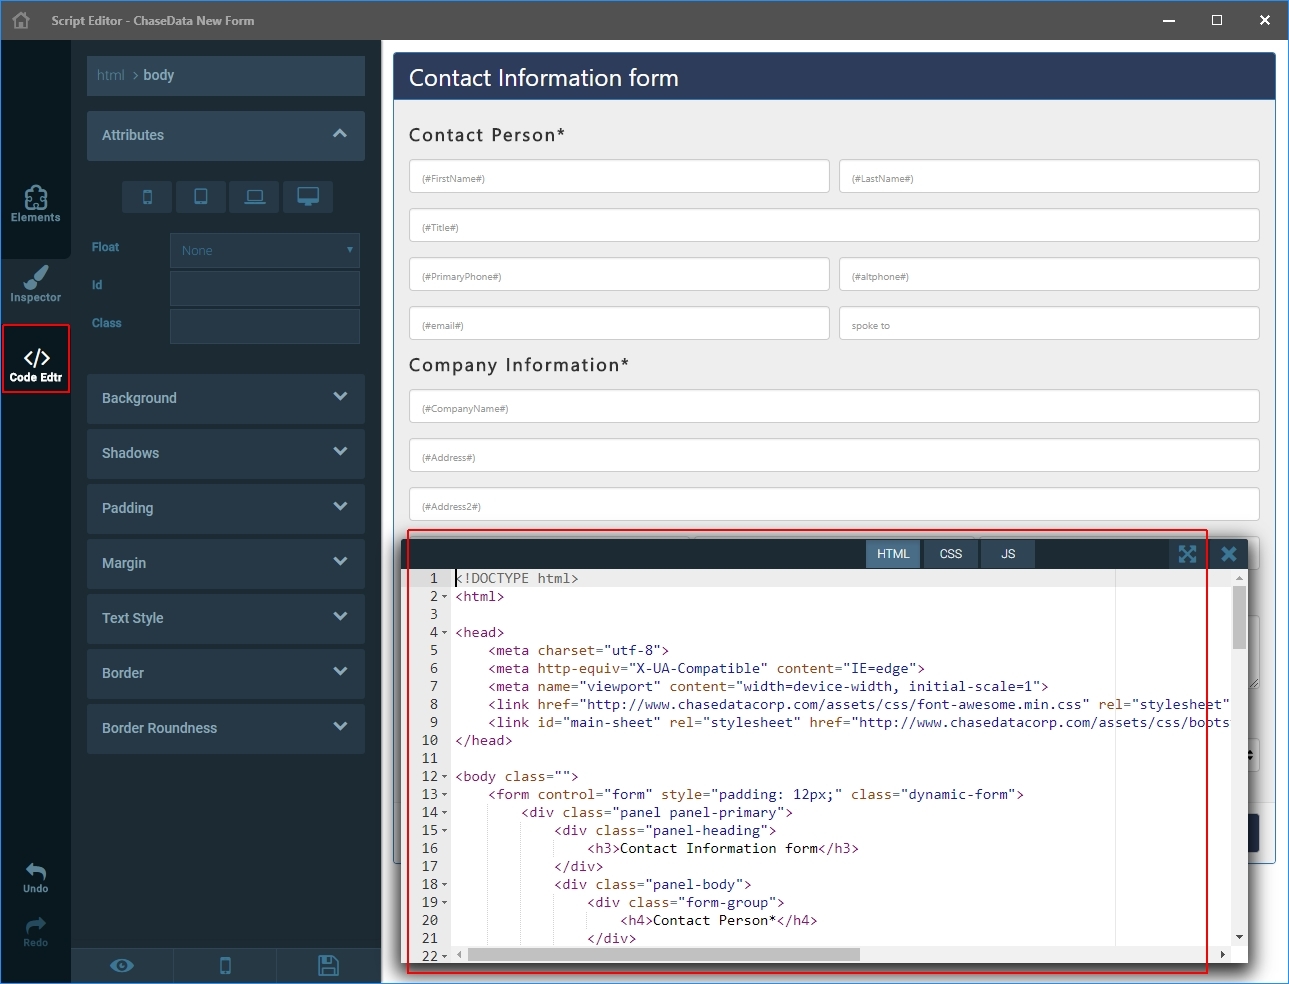
Notice that the Script Editor has two areas; the left area is a control area where available editing tools are presented, while the right area displays the script page layout and the HTML Code Editor. Refer to the following picture for the same example with the Code Editor enabled.
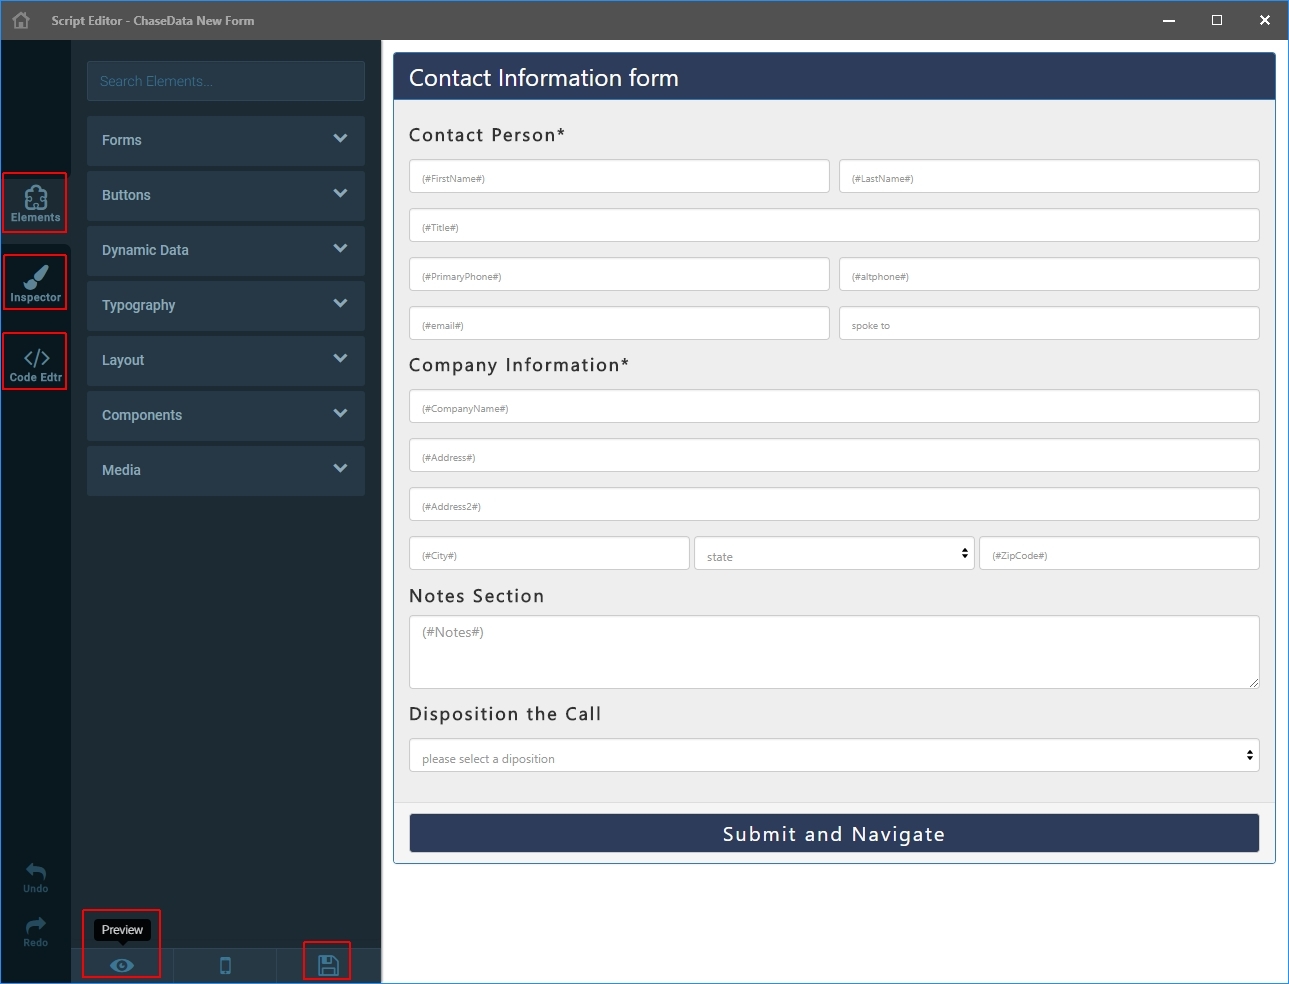
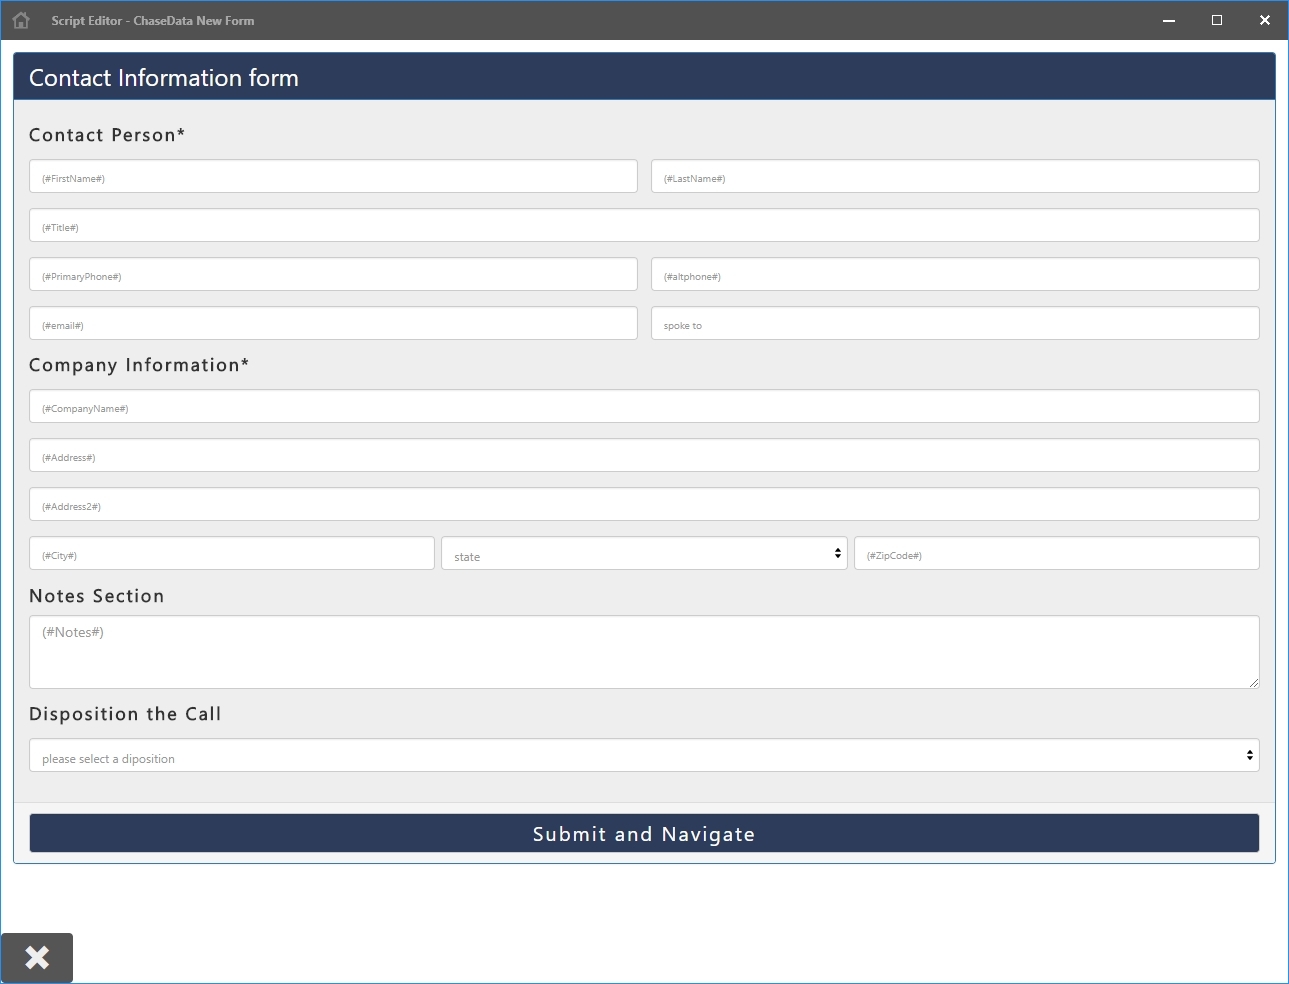
By clicking on the Preview button at the bottom of the control area, you can see how the resulting Script page will be displayed. Refer to the following picture.
As you may have already deducted from this, it is possible to edit a Script page in two ways: by designing the page through inserting HTML elements on the form in a guided way; or by typing the HTML code/commands directly. Furthermore, you can complement one with the other. As a matter of fact, you could even edit the Script page externally using a text or HTML editor.
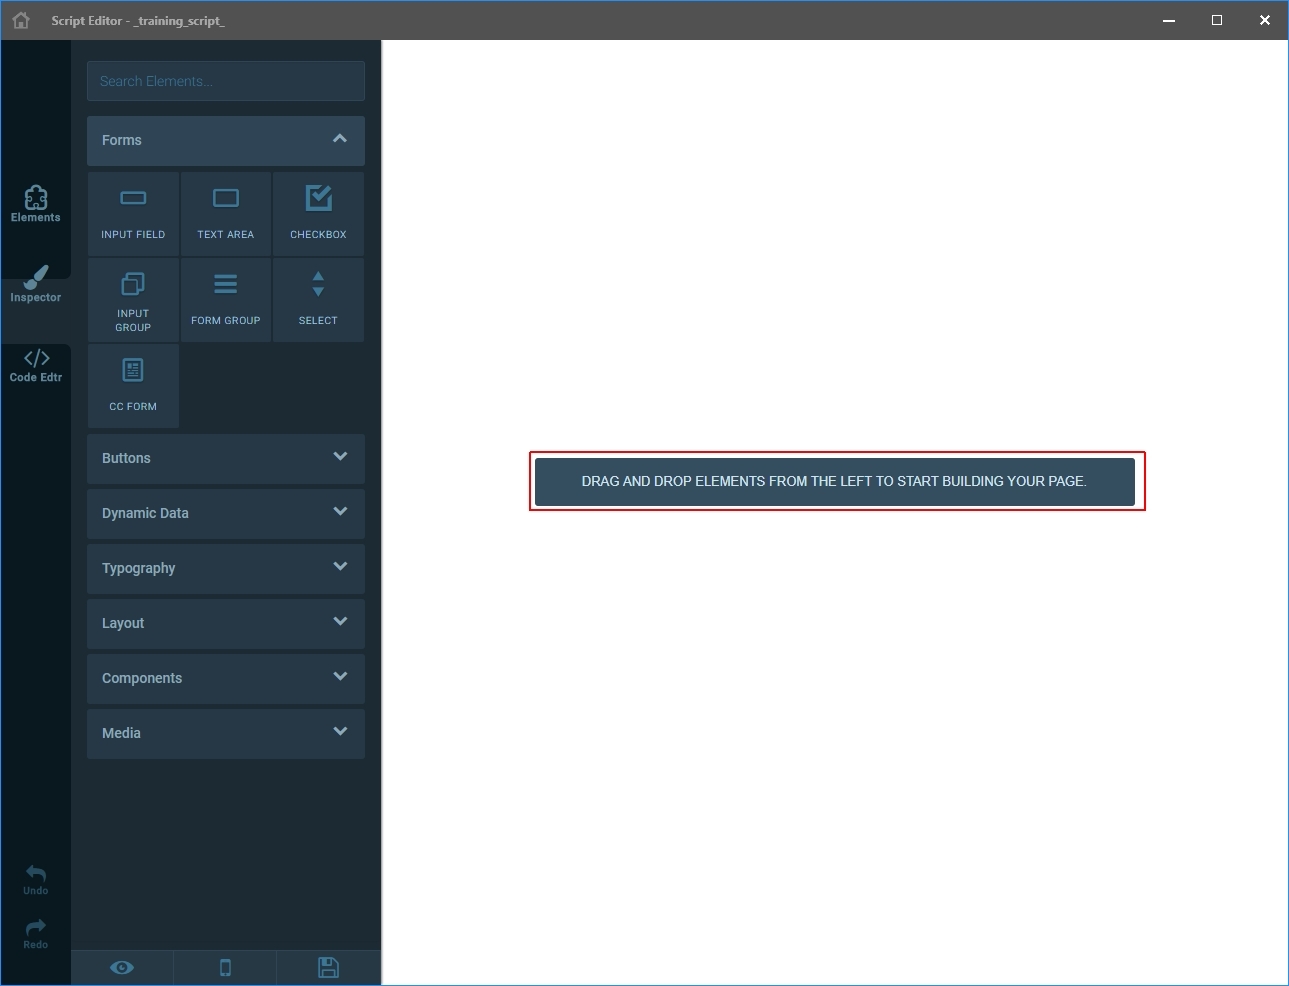
Let's see how it looks when we create a new Script page from scratch; since there's nothing yet, the script Inspector shows an empty area indicating to start adding Elements. Refer to the following picture.
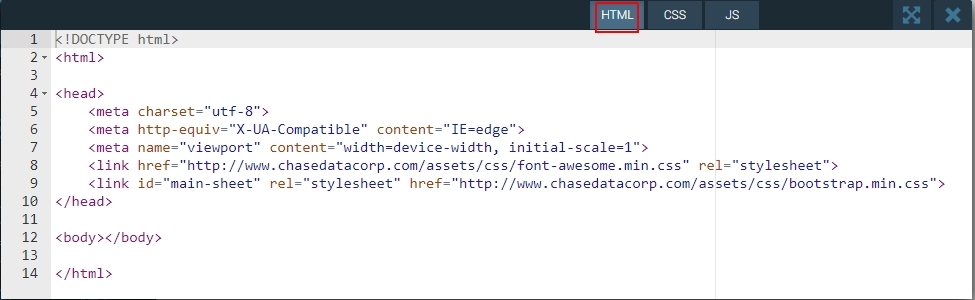
However, even though the script page is still empty, the Script Editor always adds basic HTML head information and stylesheet reference, which you can see by enabling the Code Editor area. Refer to the following picture.
If you have the basic Script page pre-designed externally, you probably want to copy the HTML code from the predesigned page and paste it in the body of your new Script page using the Code Editor. Otherwise, you can build the Script page using the different Elements available with the Script Editor; but you should be familiar with HTML and CSS in order to understand these elements and build a Script page properly.
The following pictures provide a glance to the available Elements.
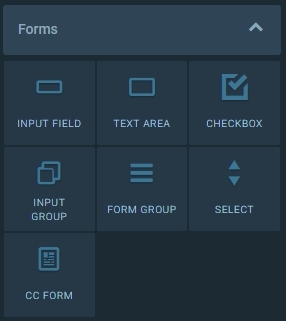
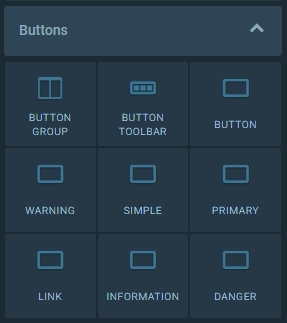
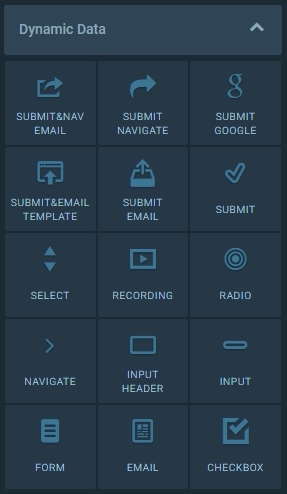
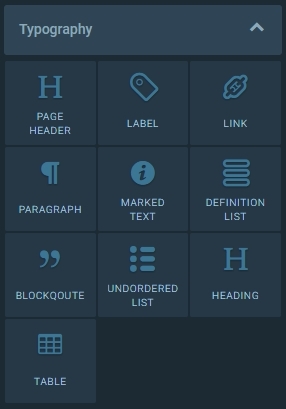
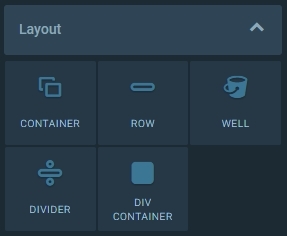
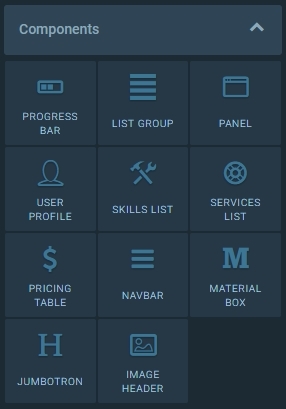

Do note that these Elements are not just basic HTML elements, but rather pre-configured composite items to facilitate quickly building a Script page with typical components; when you drag and drop one of these items, they will be pre-configured with corresponding default components and values.
We'll go through an exercise to show how to add and modify items. So, let's start from scratch and add a Form from Dynamic Data using a drag-and-drop action from the control area to the layout area; this is a pre-configured dynamic form for Contact Information inserted in the body of the HTML page. Refer to the following picture.
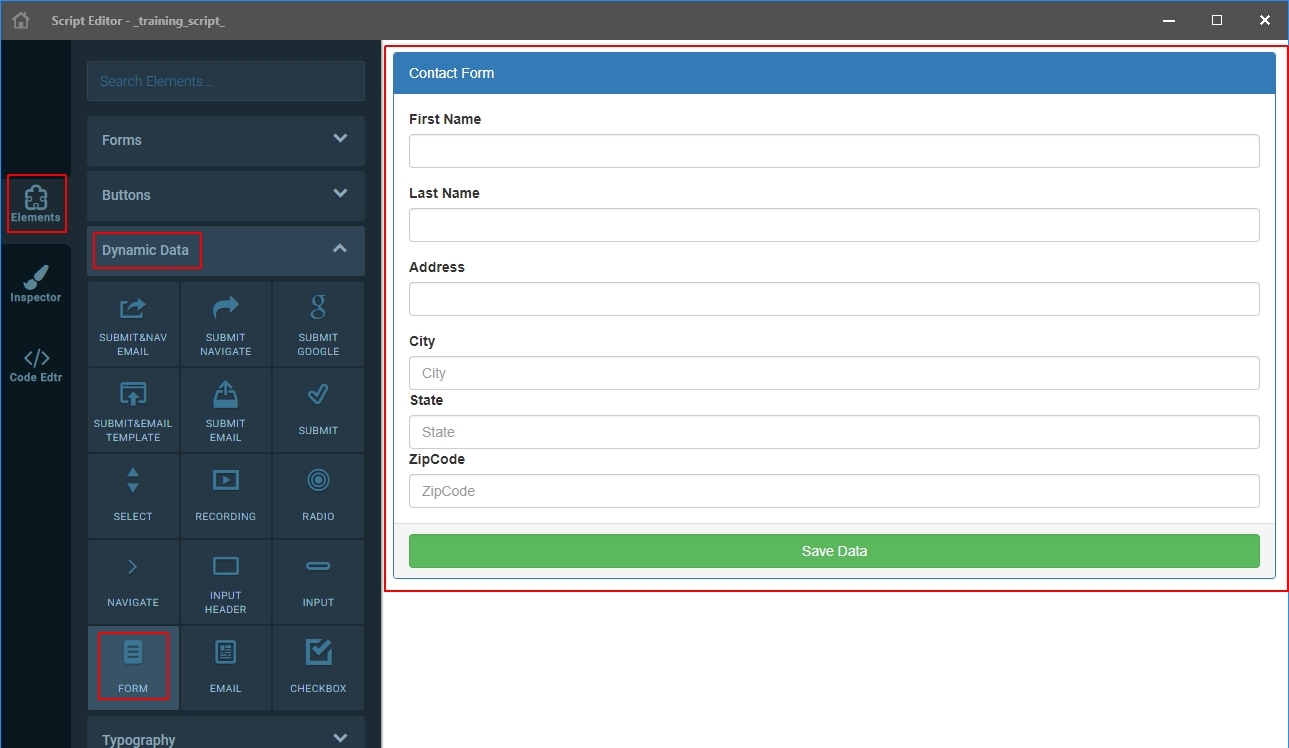
The form contains a panel, which in turn contains a panel-heading, panel-body, and panel-footer. Within the panel-body there are three form-groups (First, Last, Address), and a section with three items (City, State, ZIP).
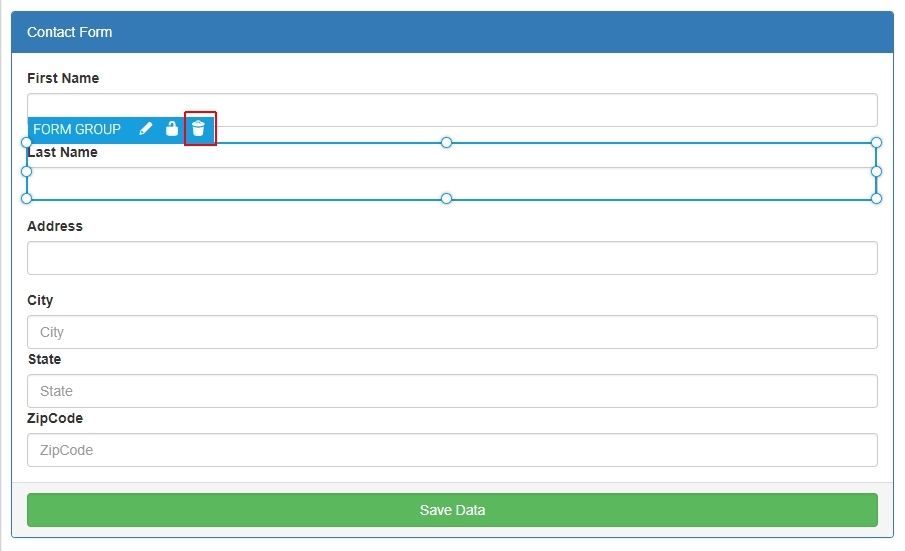
For our learning exercise, we’ll keep the form and panel, but remove the items within the panel-body (to then add our own); so, we click and delete each of them. Refer to the following pictures.

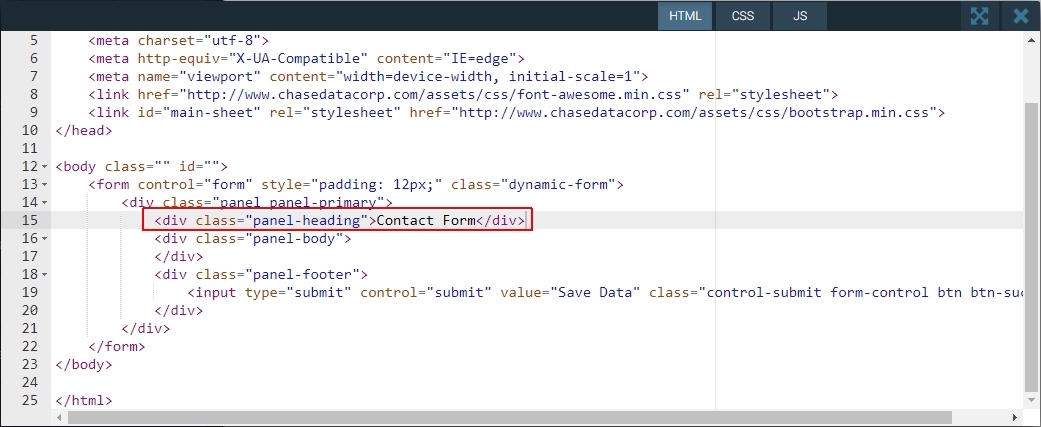
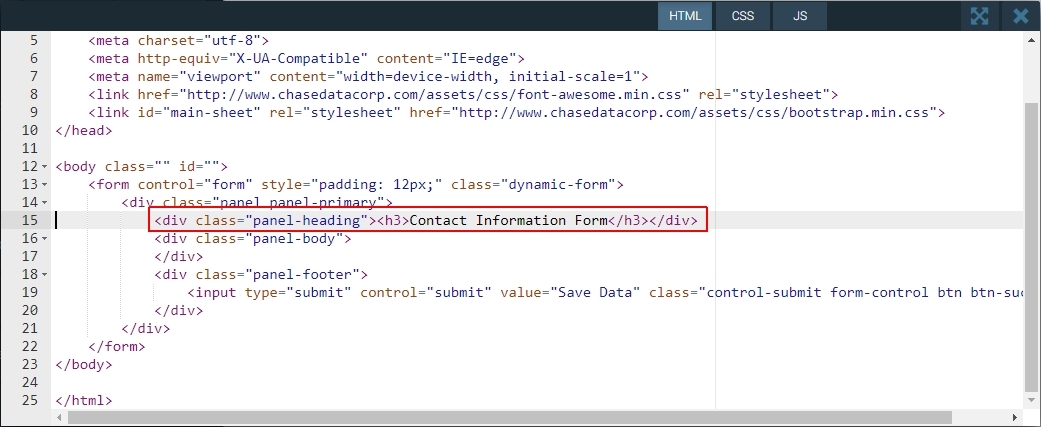
First thing we'll do is to modify the panel-heading; we'll edit the title, make it a header of level 3, and change the background color. We'll make the changes directly on the Code Editor, both on HTML and CSS. Refer to the following pictures (before and after changes).


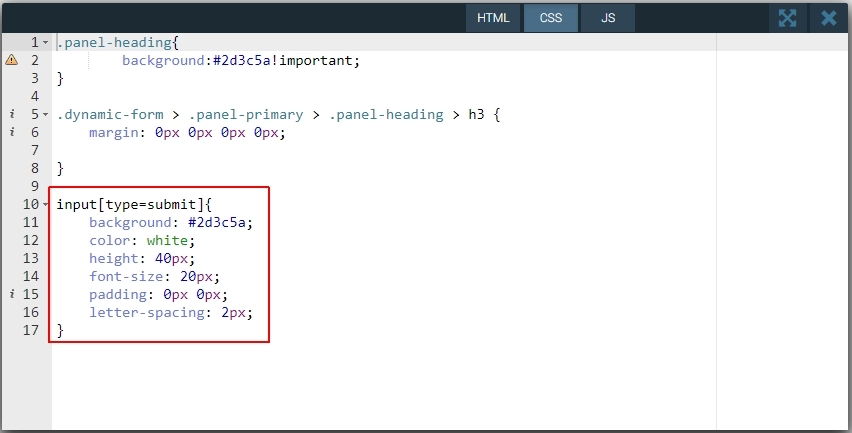
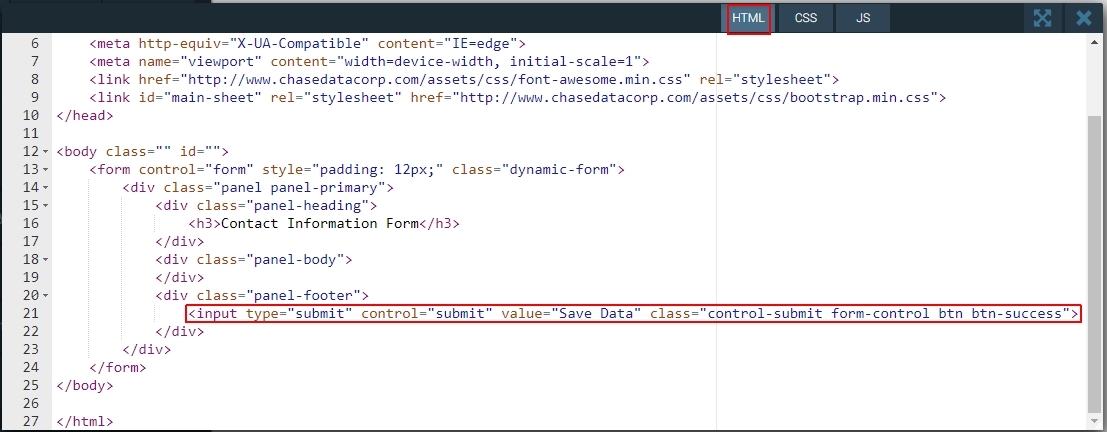
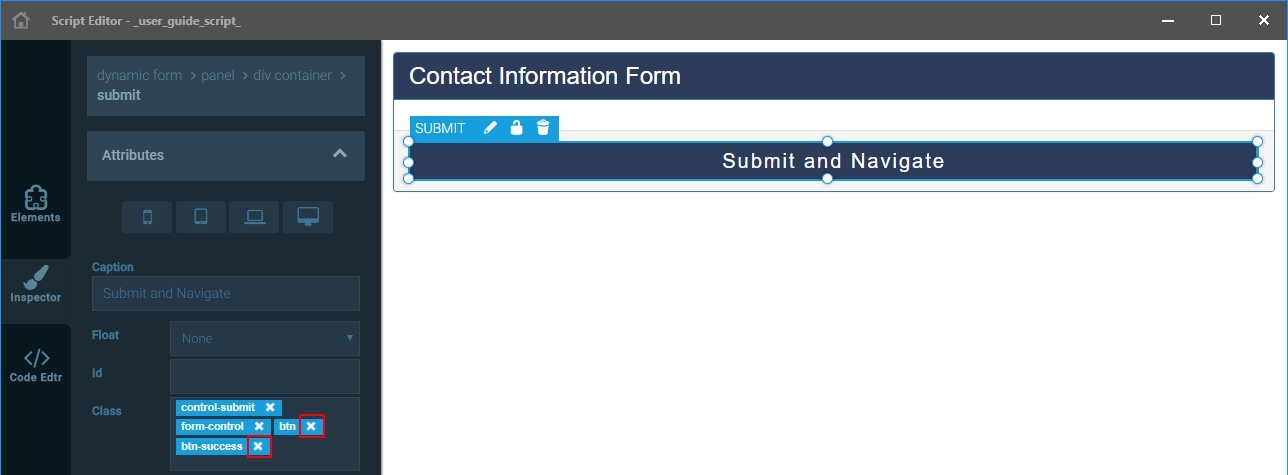
Let’s now modify the panel-footer. Refer to the following pictures.

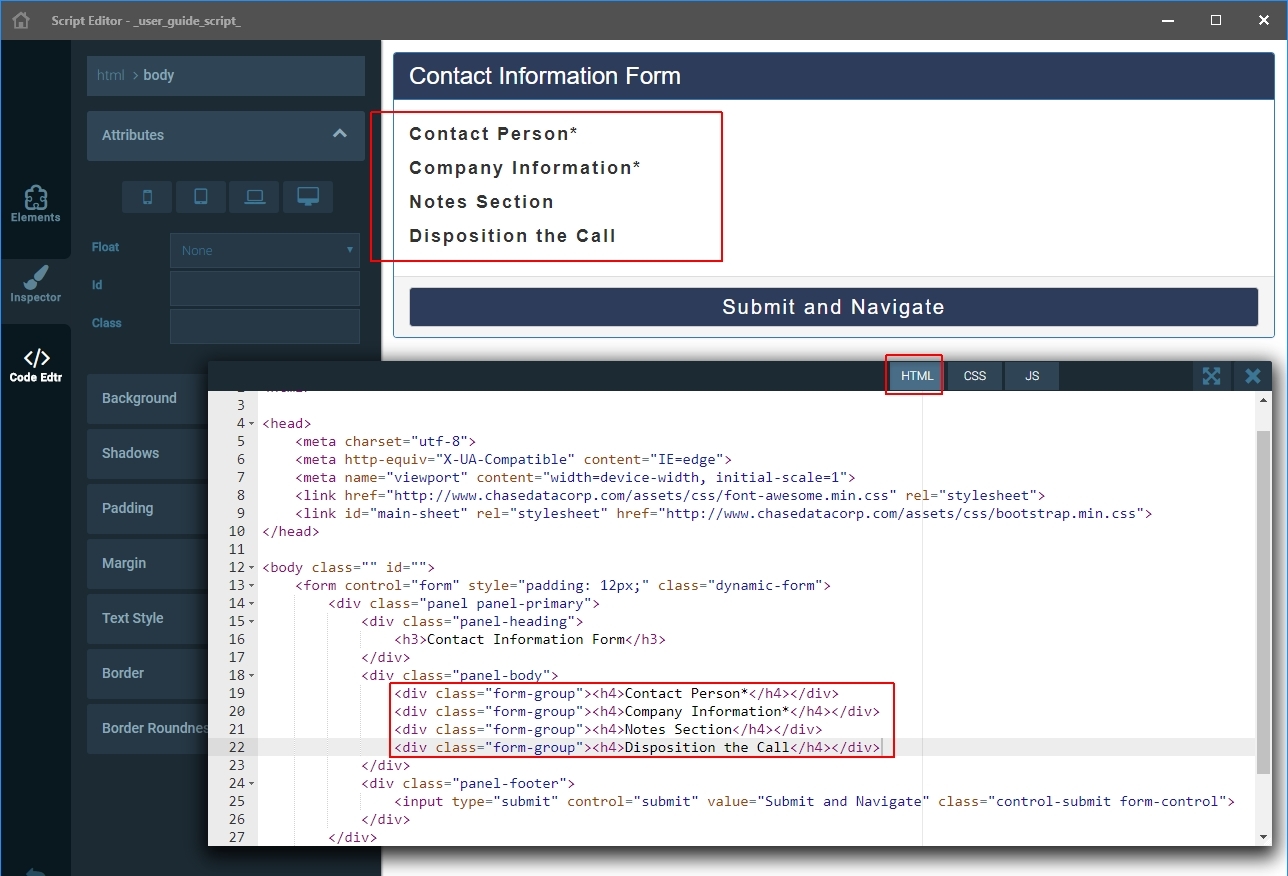
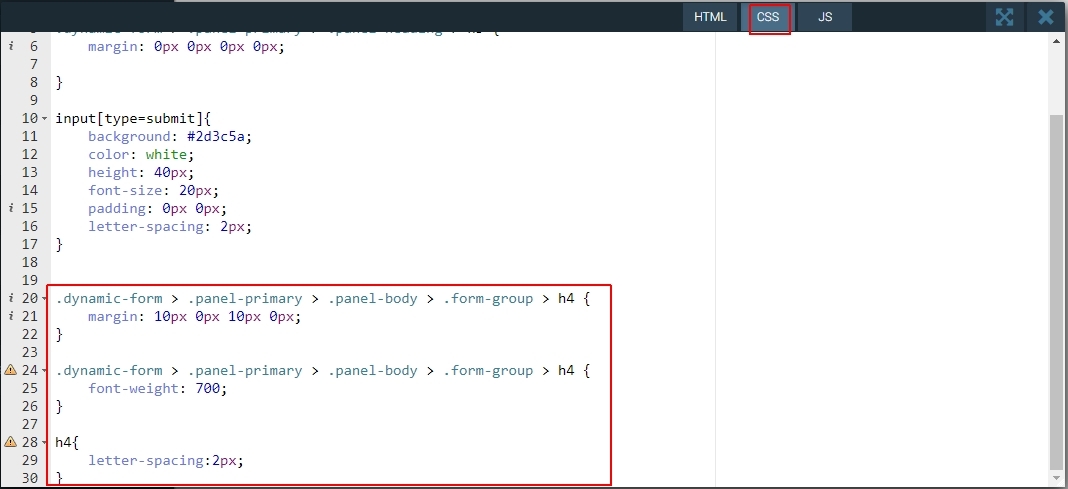
At this point, within the body of the HTML page, we have a form with a panel within it, which in turn has a panel-heading, an empty panel-body, and a panel-footer. Let's proceed to add some top-level form-groups within the panel-body. We'll do this directly on the Code Editor by adding both HTML and CSS items. Refer to the following pictures.
Let's now work on fields that correspond to the first form-group (Contact Person). There are many ways to do this, but for our example we'll go the simple route; we'll create separate form-groups for each line or row of fields, and we'll do it directly on the Code Editor.
Here's the first one, which contains two control-input elements, one for First Name and one for Last Name.
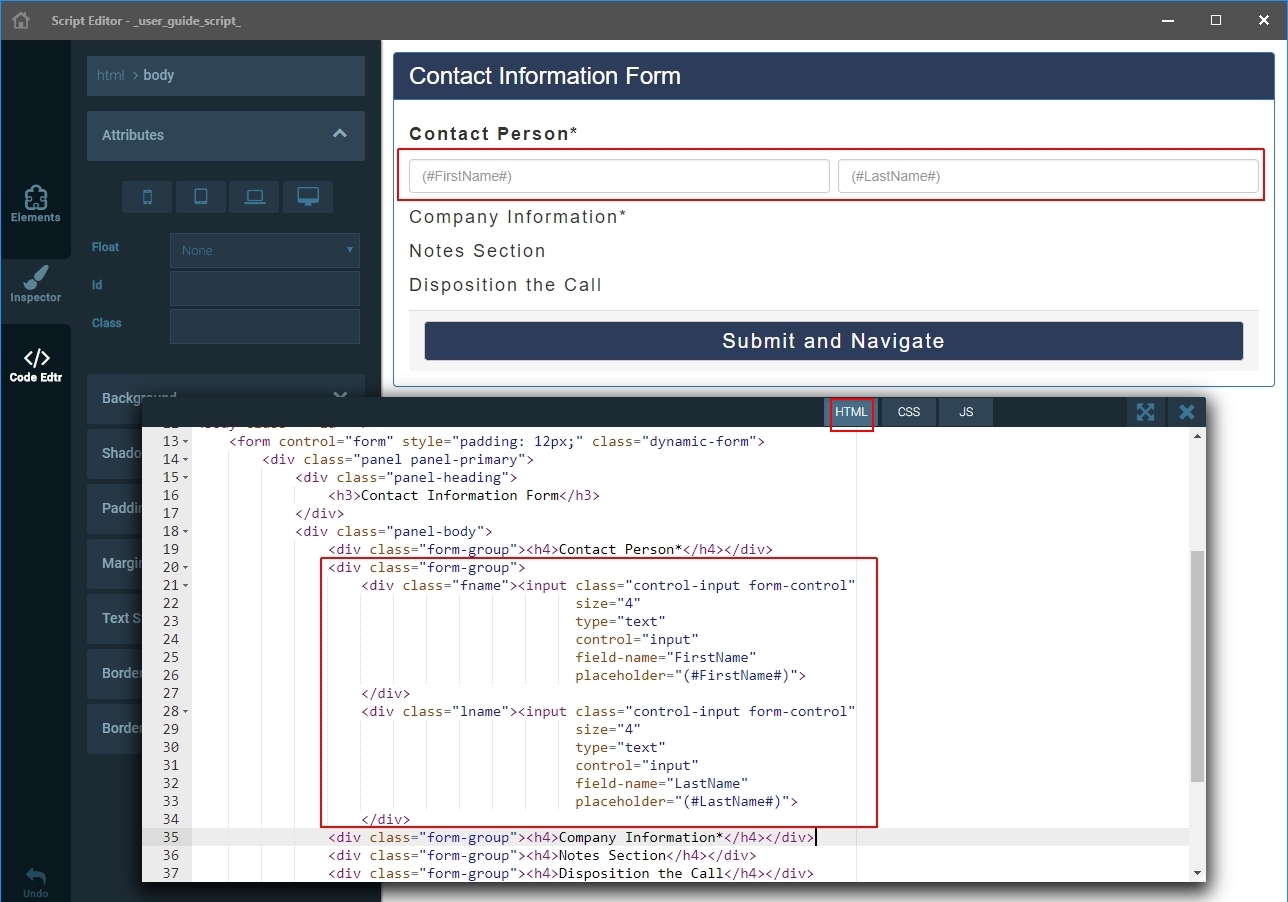
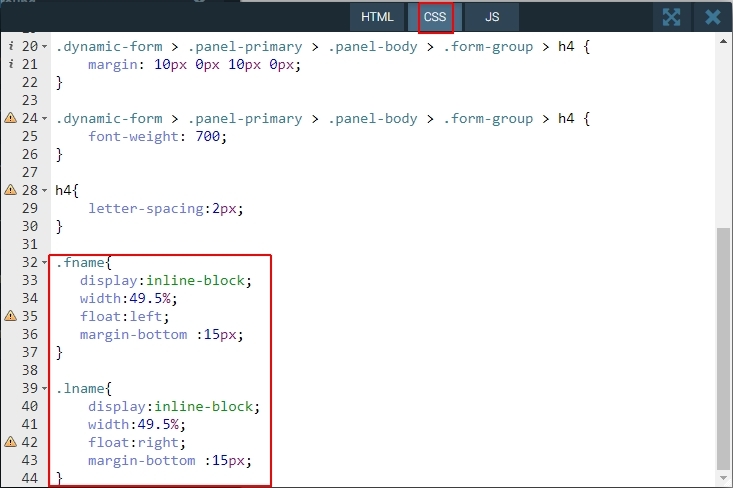
Notice that the style sheet (CSS) is indicating an even width distribution (49.5% and 49.5%) between the two control-input elements, allowing them to be in the same row, if there's enough room.
Also notice that we have used hashmark-delimited ChaseData CCaaS fieldnames (standard or custom) for placeholder (e.g. #FirstName#); this will populate those form elements with the corresponding Contact record information in the database.
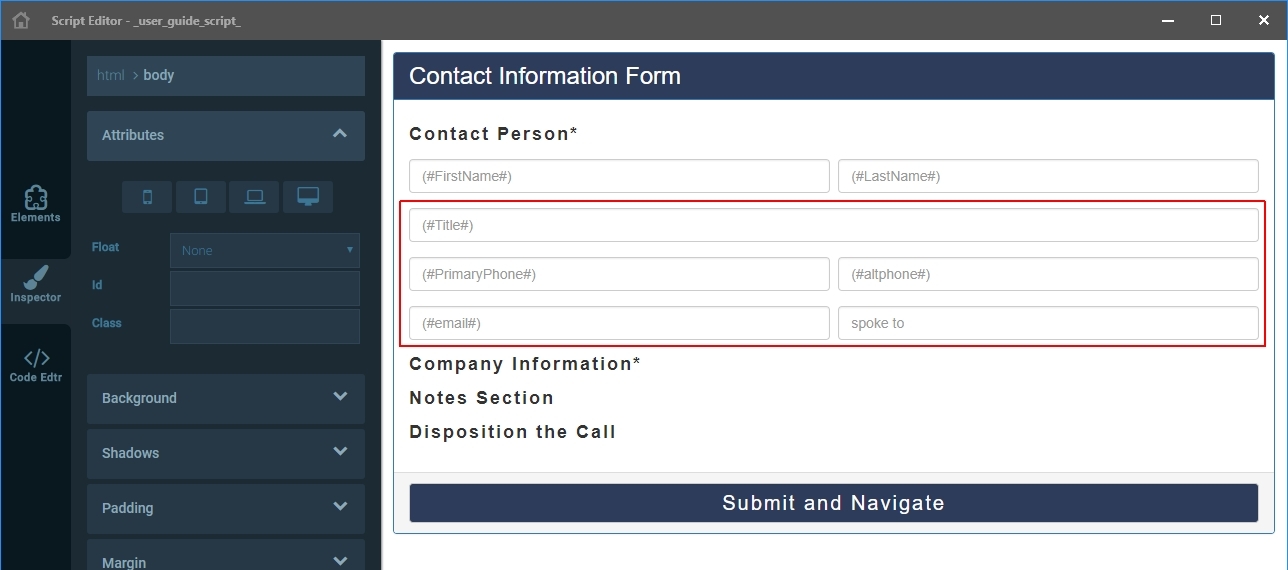
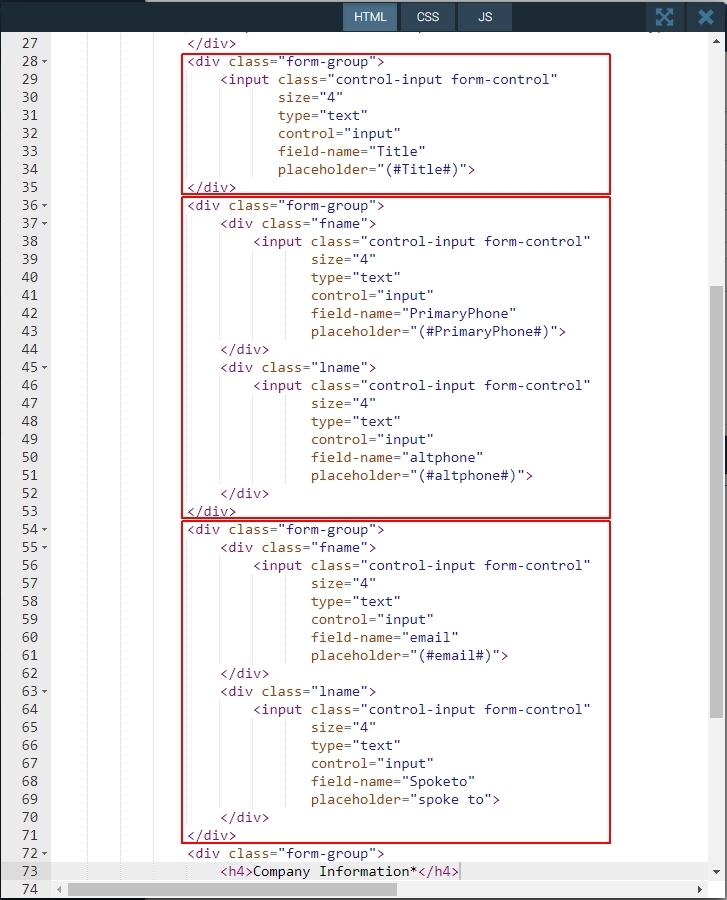
Let's now continue with the rest of the form-groups and their embedded control-input elements for the rest of the Contact Person fields; Title will be on its own, Primary Phone and Alternate Phone will be grouped (i.e. same line, if possible), and Email and Spoke To will also be grouped. Refer to the following pictures.
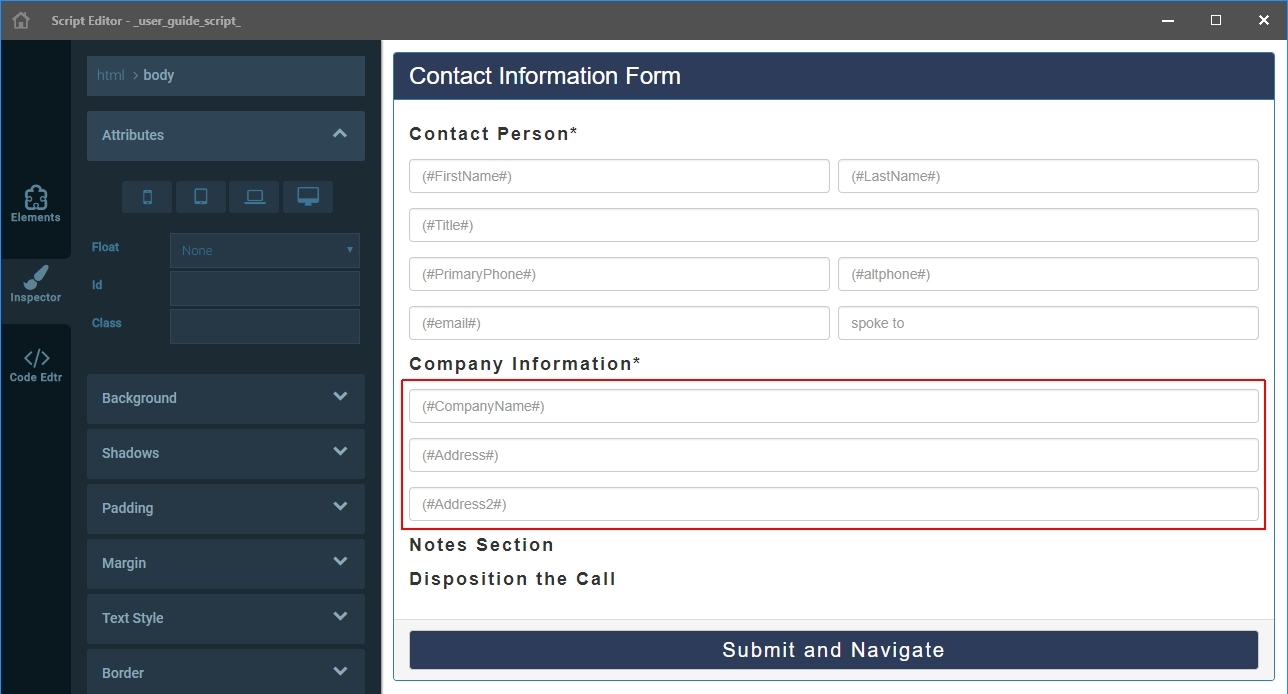
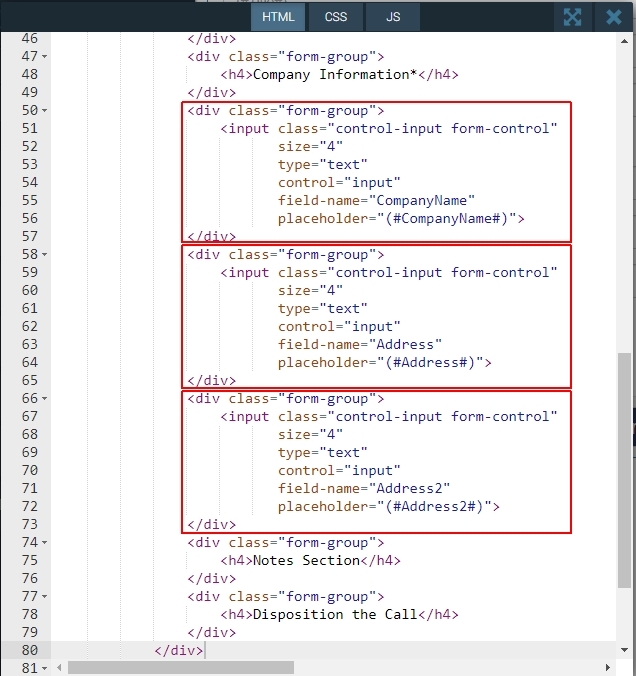
Let's proceed now to Company Information; the first three (Company Name, Address, Address2) are just like Title, full-line items. Refer to the following pictures.
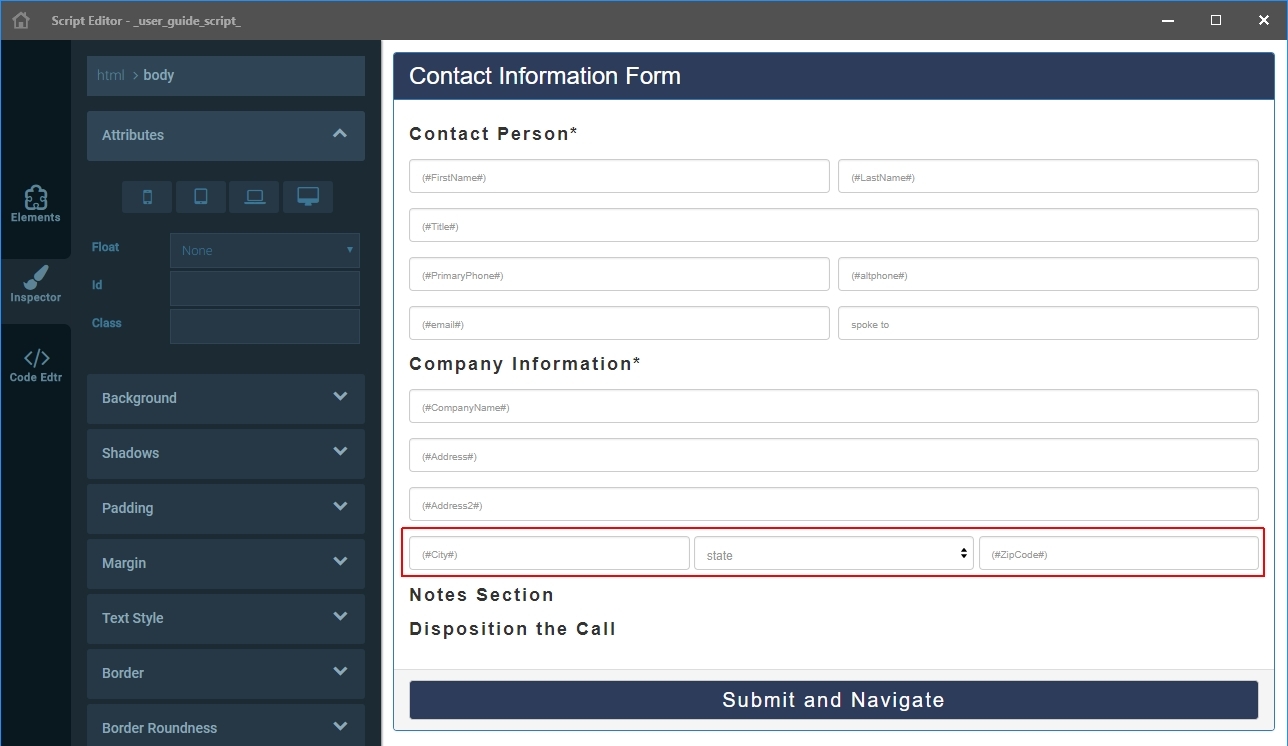
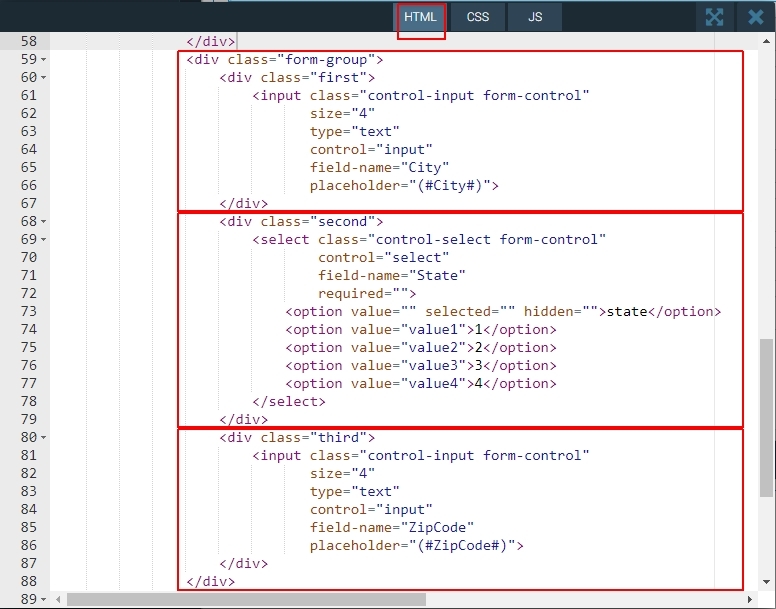
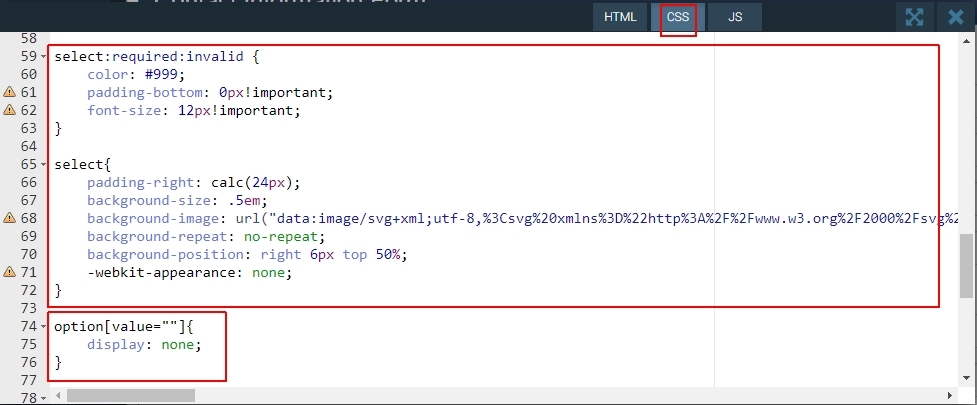
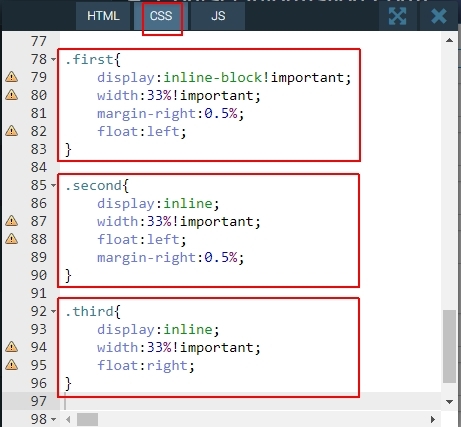
We'll do something a little different for the rest of the Company Information fields (City, State, ZIP); first, we will allow them to be on the same row, if possible; second, we will create a scroll list for State, using the select control. Refer to the following pictures.
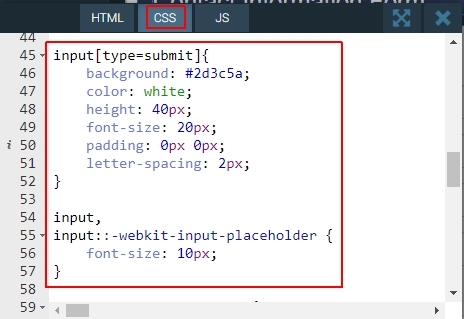
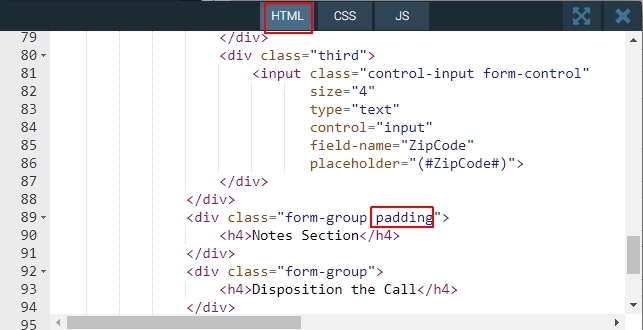
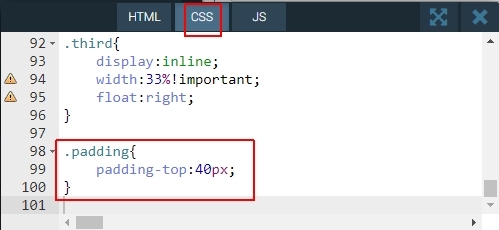
We had to add some padding to the form-group that follows (Notes Section) to fix a side effect of what we just did. Refer to the following pictures.
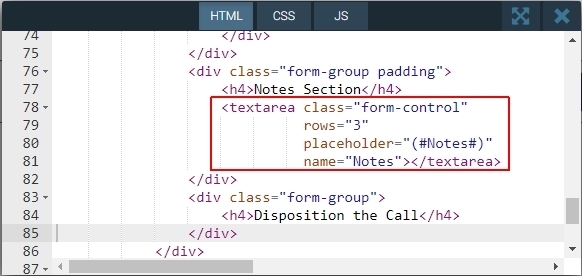
Let’s now add a textarea for Notes Section. Refer to the following pictures.

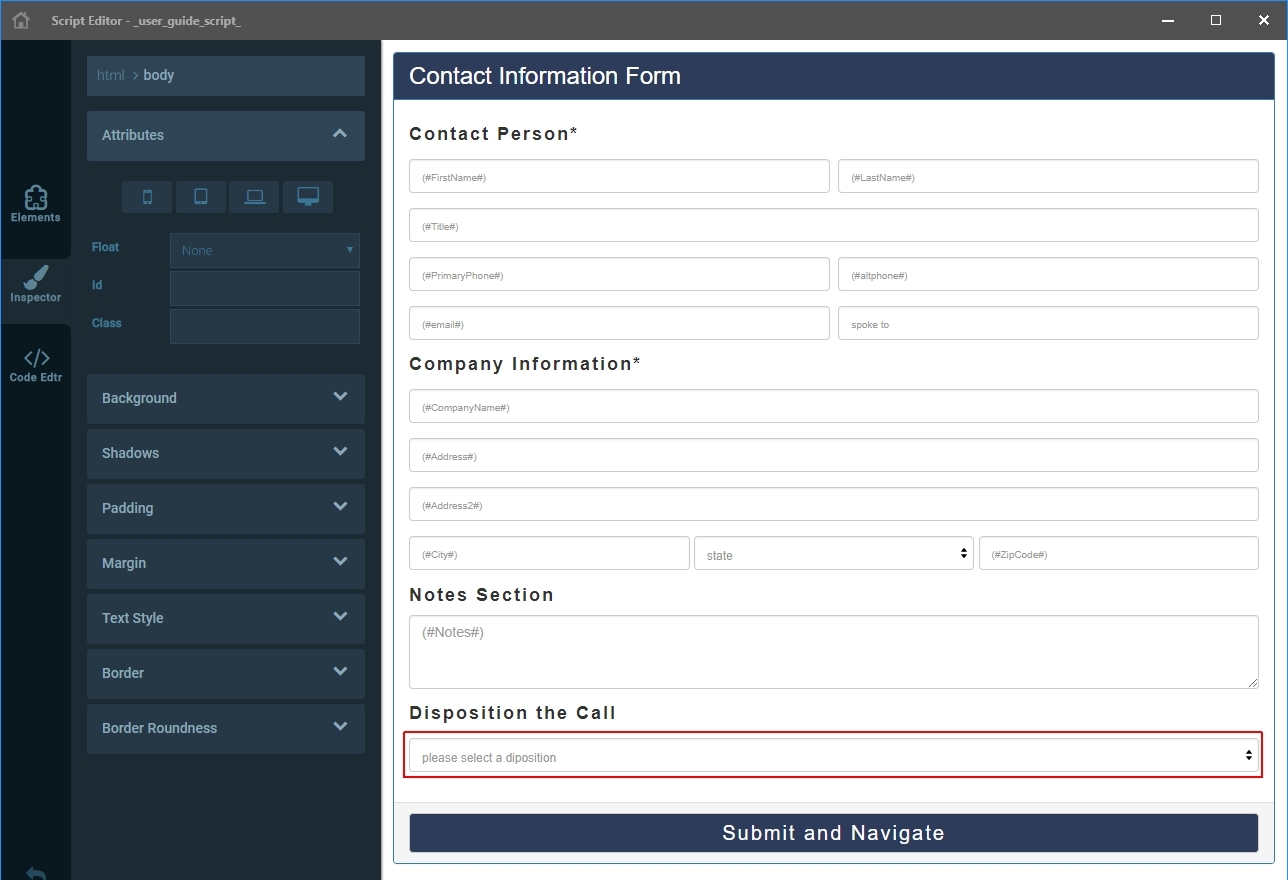
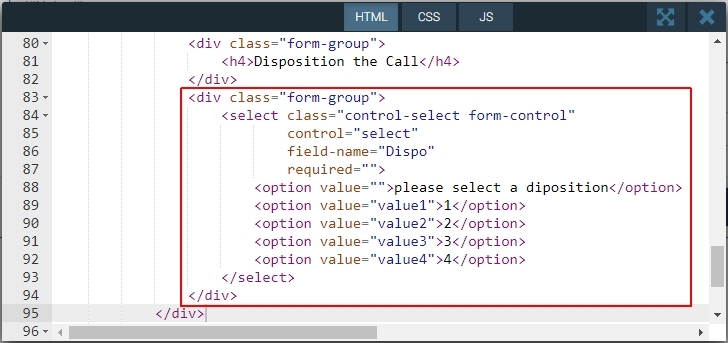
And finally, a form-group with a scroll list within it, for Disposition the Call, using the select control once again. Refer to the following pictures.
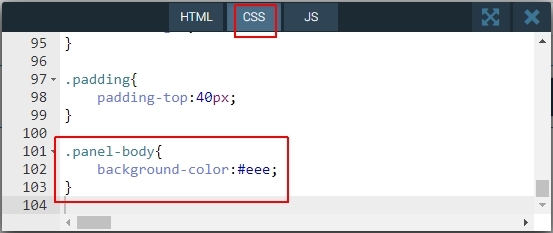
To give it a final touch, we could change the panel background. Refer to the following pictures.
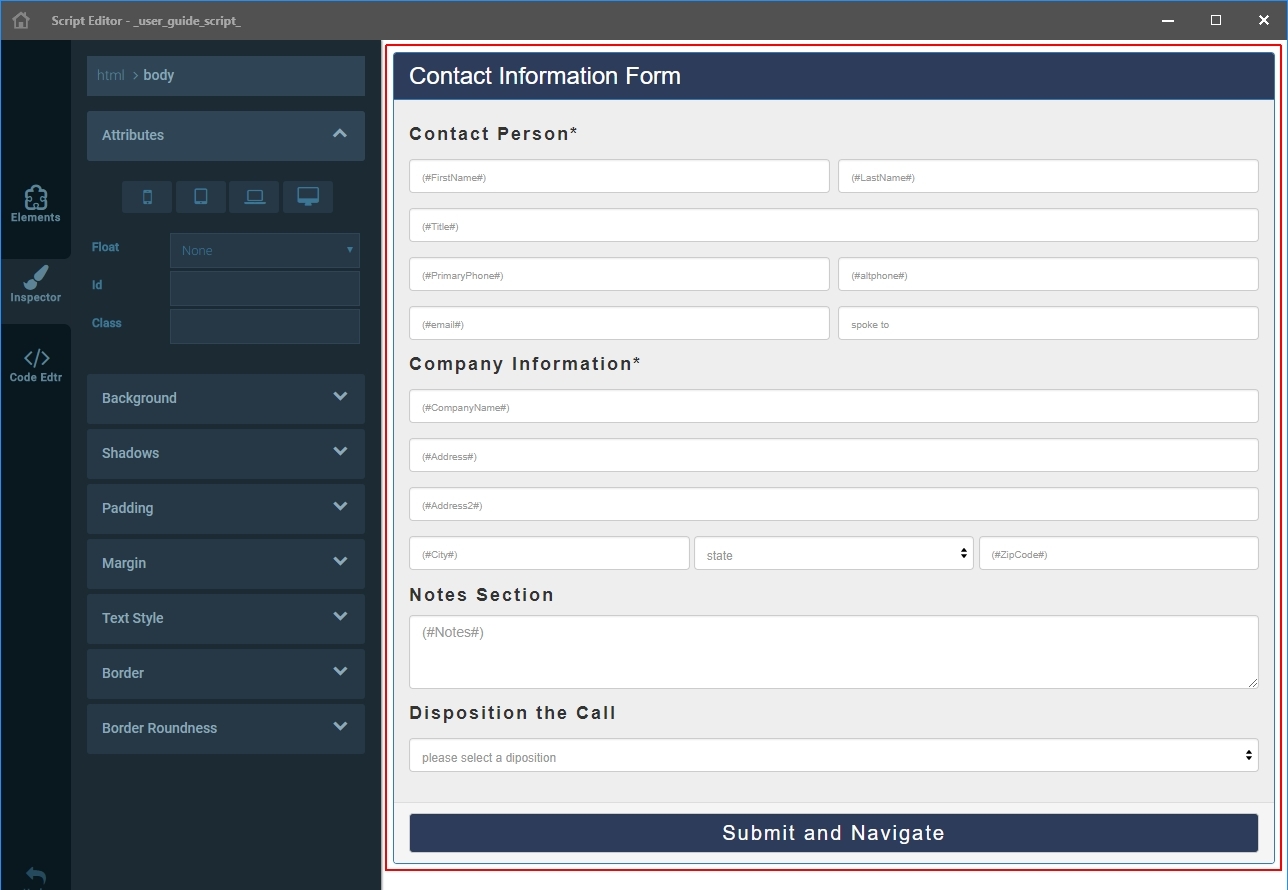
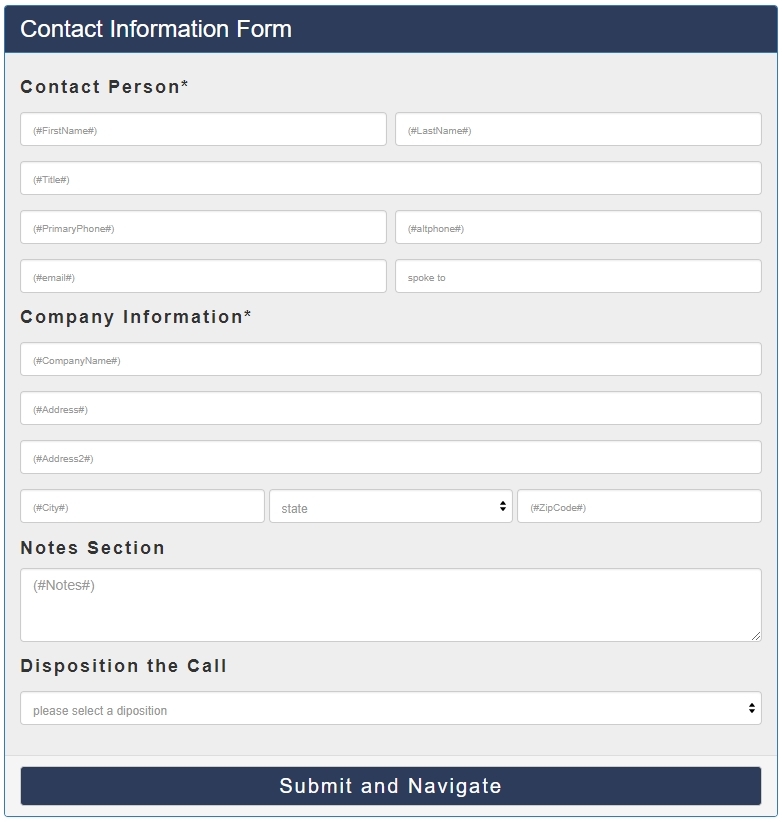
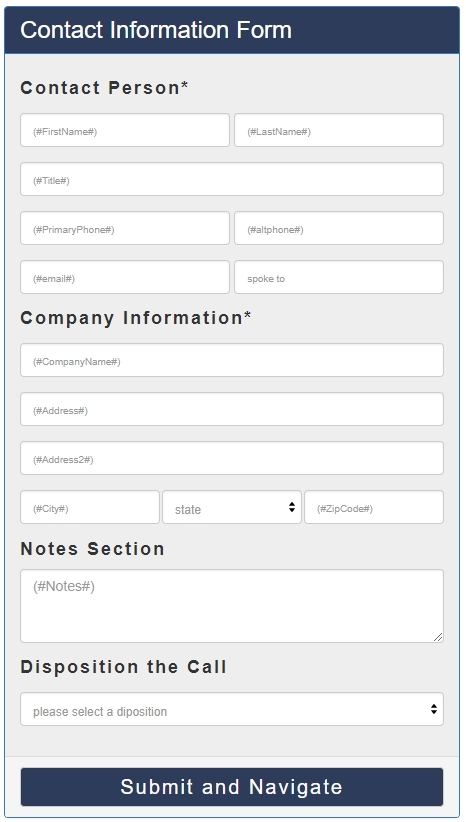
Following are previews of how the final Script page would look like. The width of the display window will have an effect; however, the look and feel should be the same if the HTML tags and style sheet (CSS) are properly put together (either with the Code Editor or using the DialedIn CCaaS pre-defined Elements).
We have concluded our example, which should give you a good jump start into creating or modifying Script pages. You should be aware of several things. For simplicity, we have built this example emphasizing the Code Editor, but the tool does provide pre-built Elements and an attribute editor (Inspector), which in most cases will allow you to build a Script page without the need to use the Code Editor.
Also for simplicity, we have not necessarily followed best practices for HTML and CSS; although effective, it could be argued that there are cleaner ways to do it. As a matter of fact, there are many ways to put together the same Script page, and you should follow the approach and design that makes more sense to you.
Finally, you could incorporate Java Script to your Script page, which we are not addressing in this guide.
As reference, let us share a couple of links where you can find HTML and CSS reference information; we do not endorse any of them, just provide them to you as one place to look at, but there are many more available.
https://www.w3schools.com/tags/default.asphttps://www.w3schools.com/cssref/default.asphttps://www.w3schools.com/jsref/default.asp
| AGENTSPCB | Agent Specific Callback |
|---|---|
| CR_BAD_NUMBER | Number is not valid |
| CR_BUSY | Busy tone |
| CR_CEPT | Disconnected number |
| CR_CNCT / CON_CAD | Cadence change; voice detected last second |
| CR_CNCT / CON_PAMD | Positive answering machine detection |
| CR_CNCT / CON_PVD | Positive voice detection |
| CR_DISCONNECTED | Call was disconnected (carrier rejected the call) |
| CR_DROPPED | Call was dropped |
| CR_ERROR | Internal dialing error; number gets called back |
| CR_FAILED | Line error; number gets called back |
| CR_FAXTONE | Fax tone |
| CR_HANGUP | Incoming caller hang up before being connected; when customer hangs up with no other actions taken (e.g. voicemail); specific to inbound calls |
| Hangup Termination | Set when an Inbound Voice Prompt that has Termination set to Hangup takes place |
| CR_CNCT/INTERRUPT | Call is canceled before it completes, e.g., a call attempt is interrupted while still ringing |
| CR_NOANS | No answer |
| CR_UNAVAILABLE | Received a "temporarily unavailable" message from telephone carrier |
| CR_UNFINISHED | Call was not dispositioned, or Call was not made |
| FTC DNC | Internal DNC (Do Not Call) |
| NR_NORB | No ring back |
| SMS ACCEPTED | System has received your request to send a message. Message might fail to be delivered and will stay in this status. |
| SMS DELIVERED | System has received confirmation of message delivery from the upstream carrier, and, where available, the destination handset. |
| SMS FAILED | The message could not be sent. This can happen for various reasons including queue overflows, account suspensions and media errors (in the case of MMS). |
| SMS QUEUED | Request to send a message was successful and the message is queued to be sent out. |
| SMS RECEIVED | The incoming message was received by one of the numbers. |
| SMS RECEIVING | The incoming message has been received by the system and is currently being processed. |
| SMS SENDING | System is in the process of dispatching your message to the nearest upstream carrier in the network. |
| SMS SENT | The nearest upstream carrier accepted the message. |
| SYS_CALLBACK | System callback with date selected |
| TRANSFERRED | Call was transferred |
| UNKNOWN | Unknown call state |
Every Field, whether system-provided Default Fields or Custom Fields (refer to Custom Data) can be referenced when creating Script pages, integrations, and other similar constructs, as applicable.
Field values are accessed using the following convention: (#Field_Identifier#)
Following, we provide a list of system-provided Field Identifiers. The Field Identifier for a Custom Field is the name of the Field.
| FirstName | First name of the contact |
|---|---|
| LastName | Last name of the contact |
| PrimaryPhone | Primary telephone number of the contact |
| CallStatus | Last call status (disposition, wrap-up code) |
| Attempt | Total number of call attempts performed on this contact |
| Rep | The currently active agent |
| Campaign | The campaign to which the contact is assigned |
| Subcampaign | The sub-campaign to which the contact is assigned |
| LastUpdated | Date and time when the contact record was last updated |
| CallDate | Date and time when the contact was last called |
| Date | Date and time when the record was created |
| CallbackDate | Date and time for when a callback is scheduled for the contact |
| CallbackNotes | General notes for the callback |
| SelectedRep | The agent assigned the callback |
| ApptStartDate | Start date and time for an appointment with the contact |
| ApptEndDate | End date and time for an appointment with the contact |
| ApptNotes | General notes for the appointment |
| SalesRep | Used to save the agent that performed a related sale |
| ClientId | Customer-defined customer identification |
| Address | Street address of the contact |
| City | City of the contact address |
| State | State of the contact address |
| ZipCode | ZIP code of the contact address |
| Notes | General notes |
| Duration | Duration of last call |
| Recording | Link to last call recording |
| GroupId | System-defined unique customer identification |
| id | System-generated unique contact identification |
| InboundSource | Number associated with the Ring Group (Call Queue) of an inbound call |
| SourceDescription | Label associated with the Ring Group (Call Queue) of an inbound call |
| InboundDescription | Label associated with the Ring Group (Call Queue) of an inbound call |
| .NET | A cross-platform, open source developer platform for building applications |
|---|---|
| a.k.a. | also known as |
| AgentSPCB | Agent-Specific Call Back |
| AI | Artificial Intelligence |
| AM | Ante meridiem |
| AMD | Answering Machine Detection |
| API | Application Programming Interface |
| Blind transfer | Transfer a call without contacting the new destination first (unannounced) |
| Callback | (1) The originator of a call is called back in a second call as a response; (2) Mechanism to call back a lead at a later time |
| Caller ID | Caller Identification - caller's telephone number transmitted to the called party's telephone equipment |
| Campaign | A series of activities undertaken to achieve a goal |
| CCaaS | Call Center as a Service |
| CEO | Chief Executive Officer |
| DialedIn CCaaS | DialedIn Call Center as a Service |
| CID | See Caller ID |
| CLI | Calling Line Identification - see Caller ID |
| CLID | Calling Line Identification - see Caller ID |
| CLIP | Calling Line Identification Presentation - see Caller ID |
| Cloud | Cloud computing means storing and accessing data and programs over the Internet instead of your computer's hard drive |
| CNAM | Calling Name Delivery - name associated with the calling telephone number that may be transmitted with a caller’s telephone number, similar to Caller ID |
| CND | Calling Number Delivery - see Caller ID |
| CNID | Calling Number Identification - see Caller ID |
| codec | code and decode - computer program for encoding or decoding a digital data stream or signal |
| Cold Transfer | An incoming phone call transferred without notice or explanation from the transferring party |
| CPU | Central Processing Unit |
| CRM | Customer Relationship Management |
| CSV | Comma-Separated Values |
| DID | Direct Inward Dialing (also called Direct Dial-In, or DDI) |
| DNC | Do Not Call |
| DPI | Dots Per Inch |
| DSCP | Differentiated Services Code Point – mechanism for classifying and managing network traffic and providing quality of service |
| DSCP EF | DSCP Expedited Forwarding - dedicated to low-loss, low-latency traffic |
| DSP | Digital Signal Processors |
| DTMF | Dual-Tone Multi-Frequency |
| e.g. | Latin abbreviation for exempli gratia that means “for example.” |
| Electronic mail | |
| etc | Abbreviation for et cetera, which means “and other things” in Latin |
| FAX | An image of a document made by electronic scanning and transmitted as data by telecommunication links |
| FCR | First Call Resolution |
| Field Identifier | A symbolic name that represents a Field (variable value) stored in the system; the Identifier is a way to reference the stored value |
| Framework | A collection of APIs and a shared library of code that developers can call when developing applications, so that they don't have to write the code from scratch |
| FTC | Federal Trade Commission |
| GB | Giga-Byte |
| GUI | Graphical User Interface |
| HTML | Hyper-Text Markup Language |
| HTTP | Hypertext Transfer Protocol |
| HTTPS | Hypertext Transfer Protocol Secure |
| i.e. | Latin abbreviation for id est and means “in other words.” |
| ID | Identification |
| IETF RFC | Internet Engineering Task Force Request For Comment - a type of publication from the technology community |
| IP | Internet Protocol |
| IVR | Interactive Voice Response |
| Jitter | A variation in the delay of received packets, generally caused by congestion in the IP network |
| JPEG | Joint Photographic Experts Group |
| kbps | Kilobit per second |
| KPI | Key Performance Indicator |
| Latency | Network latency refers to the time required for a packet of data to travel round trip between two points |
| Macro | A single computer instruction that stands for a sequence of operations |
| ms | Millisecond |
| MS | Microsoft |
| N/A | Not Applicable |
| NANP | North American Numbering Plan |
| PC | Personal Computer |
| PHP | Recursive acronym for PHP: Hypertext Preprocessor |
| PIN | Personal Identification Number |
| Pixel | Picture element - the smallest element of an image that can be individually processed in a video display system |
| PM | Post meridiem |
| PNG | Portable Network Graphics |
| Port | An endpoint of communication (e.g. TCP, UDP); a logical construct that identifies a specific process or type of network service |
| QoS | Quality of Service |
| RAM | Random Access Memory |
| RTP | Real-Time Protocol |
| SIP | Session Initiation Protocol |
| SIP ALG | SIP Application Layer Gateway |
| SMS | Short Message Service |
| SP1 | Service Pack 1 |
| TBD | To Be Determined |
| TCP | Transmission Control Protocol |
| TTS | Text-To-Speech |
| UDP | User Datagram Protocol |
| URL | Uniform Resource Locator |
| USB | Universal Serial Bus |
| VoIP | Voice over Internet Protocol |
| Warm transfer | Transfer a call after contacting the new destination first (announced) |
| Zappier | A web-based service that allows end users to integrate the web applications they use |
| ZIP code | Zone Improvement Plan code - a postal code used by the United States Postal Service |